Many people believe that a higher diamond clarity will sparkle more and look brighter than lower clarity diamonds. Conversely, a VS-2 clarity diamond might outperform a flawless diamond if the cut quality is superior.
That is why we focus intently on the proportions and optical precision. The latter being the consistency of facet shape, size, and alignment from the perspective of 360-degrees.
This tutorial on diamond clarity grades contains examples of primary inclusions. It also includes a list of acceptable clarity characteristics and advice on what to avoid at all costs.
By the end of this tutorial, you will have a better understanding of diamond clarity grades. We also want to invite you to contact us through our Diamond Concierge Service if you have any questions.
Diamond Clarity Grades:
According to the GIA, diamond clarity refers to the absence of inclusions and blemishes. In other words, the lack of internal and external characteristics affects diamond clarity.
Conversely, most people tend to think of diamond clarity in terms of the inclusions that are present. Consequently, that slight change in thinking is apt to change your perception of diamond clarity.
After all, we're referring to the absence of inclusions rather than the presence of characteristics. In that case, a diamond might be "Very Slightly Included" (VS) if only minor inclusions are present and the majority of the stone is free of inclusions.
Note that each clarity grade represents a range or spectrum of possibility. As such, it would be overwhelming to try and cover all of it on one page. For that reason, we'll touch on each clarity grade below, then break it out into separate pages to provide more details.
The GIA Diamond Clarity Grades from Best to Worst:
Most people don't realize that the laboratories grade diamonds depending on the absence of inclusions rather than a presence. In that case, the GIA Clarity Scale gives the highest rating to the clarity with fewer inclusions:
Flawless Diamond Clarity (FL):
(FL): Inclusions are not visible at 10x magnification, but might appear at higher degrees of magnification.
It's human nature to want things to be as perfect as possible. In that case, you might be contemplating buying a flawless diamond. After all, what better way to show your princess that you think she's flawless?
Although that may be true, the Flawless clarity grade depends on whether the inclusions are visible under 10x magnification. In that case, the clarity characteristics might be observable if you scrutinize the diamond more closely.
In other words, a diamond that is flawless at 10x magnification might not look the same under 30x power. Consequently, it seems like there is a parable hidden in there somewhere.
Internally Flawless Clarity (IF):
(IF): The diamond is internally flawless, but there may be surface blemishes or grain lines.
There isn't much reason to show you a photograph of an Internally Flawless clarity diamond. After all, there isn't much to see inside of IF-clarity diamonds under standard 10x magnification.
In the same way as diamonds with flawless clarity, it might be possible to see inclusions if you use higher power magnification. Diamonds of this clarity grade may also contain surface blemishes because they are flawless internally, not externally.
Although that may be true, there is more to buying a diamond than deciding on the combination of carat weight, color, and clarity. The degree of optical precision and range of proportions is essential to light performance.
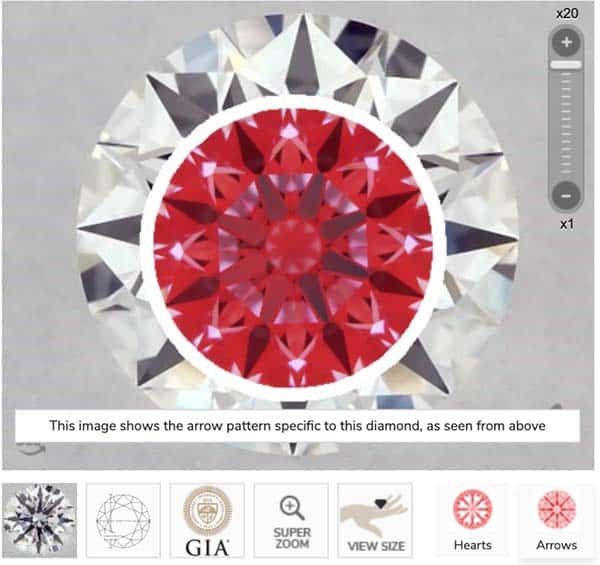
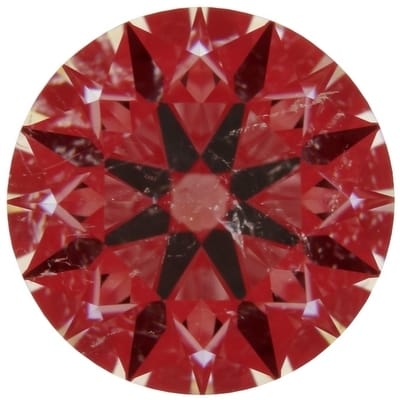
For example, the Ideal Scope image for this 1.18 carat, D-color, Internally Flawless clarity, James Allen True Hearts diamond reveals a moderately high degree of light leakage. That is what the light pink and semi-transparent sections along the edge of the table facet indicate.
Under the circumstances, you might wonder how an Internally Flawless GIA Excellent H&A diamond can leak so much light.
VVS-1 Clarity Diamonds:
Very, Very Slightly Included 1: The Inclusions will be very difficult to locate using 10x magnification.
Keep in mind that we grade diamonds in relationship to a lack of inclusions. In that case, more clarity characteristics will be evident as we venture down the GIA clarity scale.
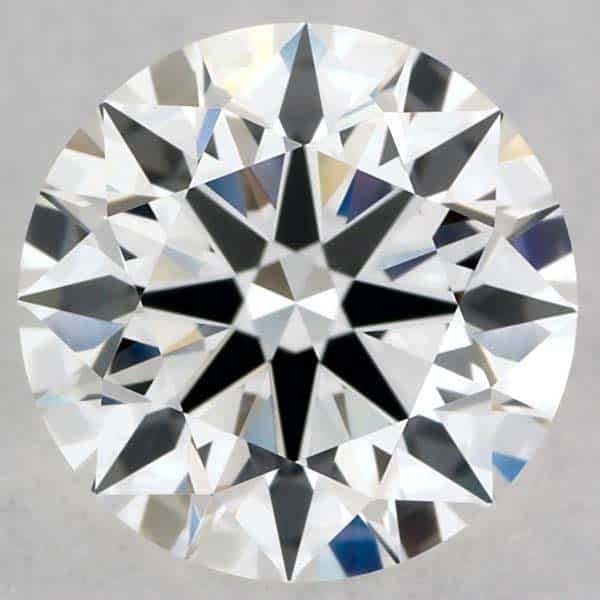
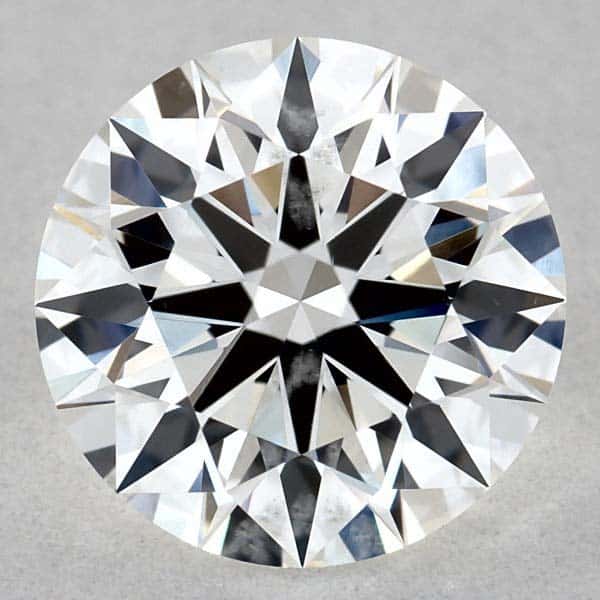
The inclusions within this 1.12 carat, D-color, VVS-1 clarity, James Allen True Hearts diamond are within the pavilion. In other words, the primary inclusions appear in the lower half of the diamond.
That is good because it can be more even more challenging to find the inclusions. However, you might still be able to see inclusions of this nature in the face-up position.
Consequently, a lot of VVS-1 clarity diamonds have inclusions in the crown section. The abbreviation VVS1 means that the inclusions will be Very, Very Slight.
In other words, they will be challenging to locate even using a higher degree of magnification. Once again, a VVS-1 clarity diamond will face up the same as a VS-2 without magnification.
With this in mind, I consider clarity to be less important than the degree of optical precision. However, you might prefer a higher clarity for peace of mind. In that case, you should buy whatever grade enables you to sleep soundly.
VVS-2 Clarity Diamonds:
Very, Very Slightly Included 2: The Inclusions will be difficult to locate using 10x magnification.
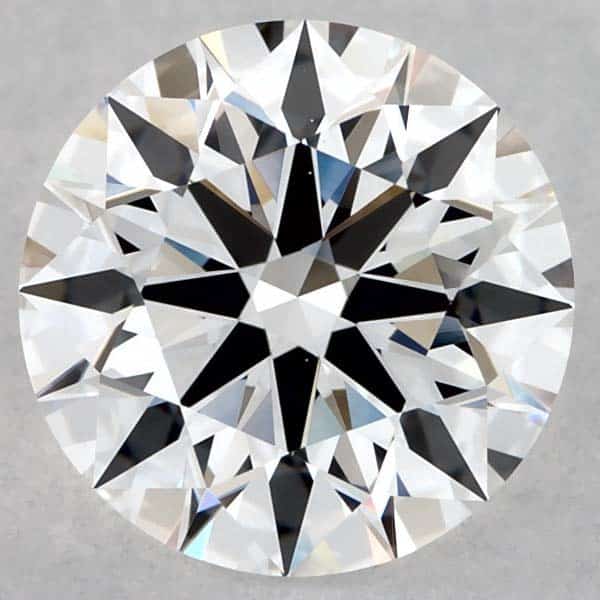
As you can see, the inclusions within this 1.01 carat, G-color, VVS-2 clarity, James Allen True Hearts diamond are challenging to see. That is typical of the VVS2 clarity grade because the inclusions are very, very slight.
Although this may be true, the inclusions are just under the table facet. There are several diamond crystals and a small feather. Of course, they're not very easy to see in this photograph, even at 35X magnification.
In the first place, this is the nature of VVS2 clarity diamonds. After all, the inclusions are very, very slight. Hence, the VVS-2 abbreviation for Very, Very Slightly included in the second degree.
Under those circumstances, this VVS-2 will face up the same as a VS-2 clarity diamond. In other words, both diamonds are going to face-up eye-clean even to a skilled grader.
With that in mind, I don't see the benefit of buying higher clarity diamonds. Of course, some people see diamond clarity as being more of a mind-clean thing.
In that case, you should focus on whatever degree of clarity you find most appealing. After all, you're going to be wearing this ring for a long time. With that in mind, it's essential that you like the characteristics.
VS-1 Clarity Diamonds:
Very Slightly Included 1: The Inclusions will be readily & immediately visible under magnification.
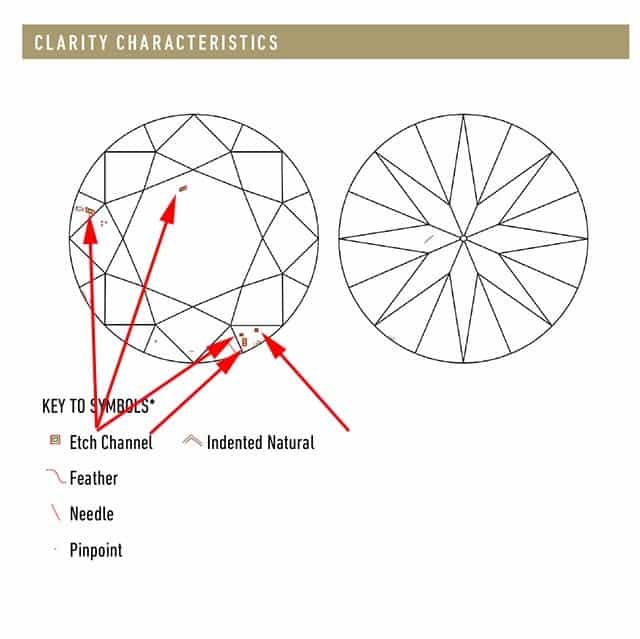
This 1.13 carat, D-color, VS-1 clarity, James Allen True Hearts diamond is an interesting specimen. In the first place, the diamond has the proportions that I recommend.
As such, it should exhibit a high volume of light return and a virtual balance of brilliance and dispersion. However, the diamond contains an "etch channel," and I don't like that type of inclusion.
If you look closely, you will be able to see the etch channel to the left of the arrow tip in the six o'clock position. Technically speaking, an etch channel is an opening left behind by air bubbles escaping the diamond under pressure.
However, etch channels can also result from laser drilling a diamond to reduce the appearance of certain types of inclusions. Under those circumstances, I try to avoid them.
In other words, this is not the type of VS-1 clarity diamond I recommend. However, it serves as an example of the kinds of issues present in higher clarity diamonds.
VS-2 Clarity Diamonds:
Very Slightly Included 2: The majority of VS2 Clarity Diamonds are going to face-up eye-clean.
The VS-2 diamond clarity grade is my favorite choice because it should be eye-clean. In that way, it's a good value proposition that won't break the bank.
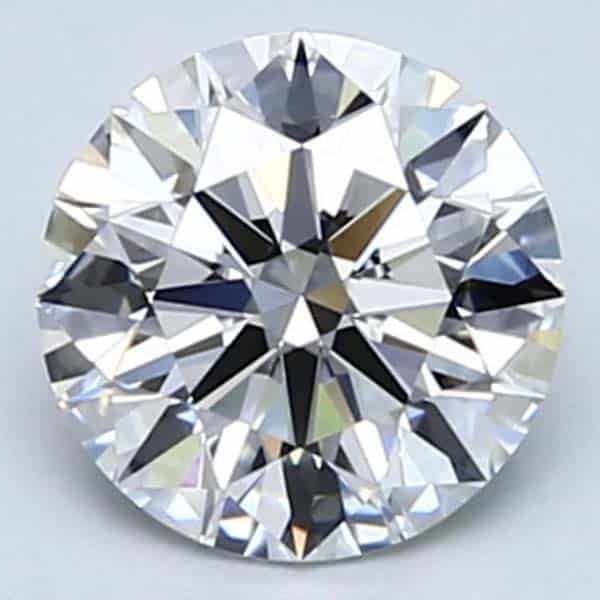
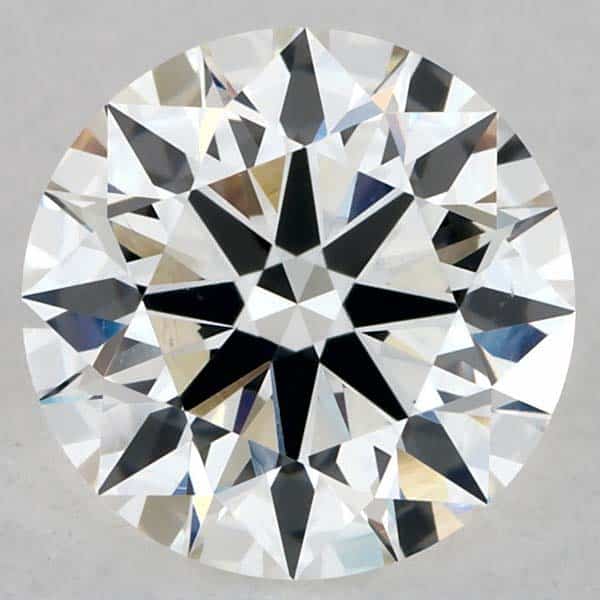
This 1.03 carat, G-color, VS-2 clarity, James Allen True Hearts diamond is a good option for those reasons. The inclusions are barely visible, which makes sense because VS-2 stands for Very Slight, 2nd degree.
Under those circumstances, the clarity characteristics should be difficult to find using 10x magnification. In this case, the inclusions are visible in the eight o'clock region along the table facet's edge.
There are also some inclusions visible within the kite-shaped bezel facet in the nine o'clock region. You might even be able to see a few other minute inclusions if your eyes are sharp.
The GIA also indicates that "additional clouds, pinpoints, internal and surface graining are not shown." That comment means that the grader was able to see those inclusions using higher degrees of magnification.
Despite that fact, the inclusions are not indicated on the plotting diagram because they are not significant enough to provide reliable identification. In other words, they are small enough that some people might see them using magnification, and other people will not.
SI1 Clarity Diamonds:
Slightly Included 1: The Inclusions within SI1 Clarity Diamonds may be visible without magnification.
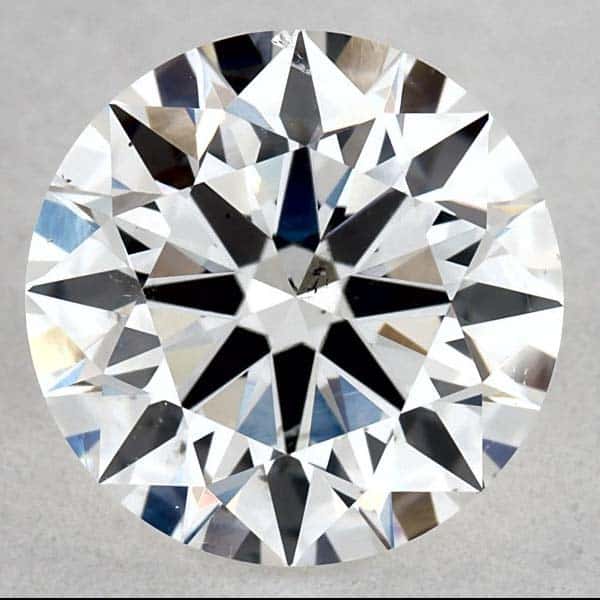
The SI-1 abbreviation means that the diamond is Slightly Included in the first degree. Consequently, this 1.07 carat, E-color, SI-1 clarity, James Allen True Hearts diamond is a typical example of this clarity grade.
In that case, the clarity characteristics should be readily and immediately visible using 10X magnification. Although 10x is the standard for diamond clarity grading, this photograph shows the diamond at 35X magnification.
This diamond does not meet our selection criteria because it contains a chip on one of the lower girdle facets. If you look closely, you might be able to see the chip in this photograph.
I'll give you a hint. It's not the white diamond crystal to the left of the arrow tip in the 12 o'clock region. One of the challenges of buying a diamond is determining the location of the inclusions.
In this case, the chip appears in the five o'clock region of the lower plotting diagram. That means it will be on the upper half's flipside, so look for it in the seven o'clock region. Look for the light grey splotch at eight o'clock just right of the arrow tip.
SI-2 Clarity Diamonds:
Slightly Included 2: The Inclusions within SI2 Clarity Diamonds are likely to be visible without magnification.
The inclusions within this 1.04 carat, G-color, SI-2 clarity, James Allen True Hearts diamond look very slight. Under the circumstances, you may or may not be able to see the inclusions without magnification.
In that case, it might seem like an eye-clean SI2 clarity diamond from your perspective. Although that may be true, the ability to see inclusions varies from person to person.
As a matter of fact, I've always been able to find the inclusions within slightly included diamonds without magnification. Especially once I know where and what to look for in terms of the clarity characteristics.
At the same time, the diamond that Brian Gavin cut for my wedding ring was SI-2 clarity. In that case, I chose a lower clarity diamond so that I could afford a larger carat weight. As a matter of fact, the only thing that people seem to notice is the sparkle factor.
I-1 Diamond Clarity (Heavily Included):
Included: The Inclusions within I1 Clarity Diamonds are immediately and readily visible without magnification.
In the first place, the majority of I1 clarity diamonds will not be eye-clean. As a matter of fact the majority of them look pretty busy. With that in mind, this 1.01 carat, F-color, I1 clarity, James Allen True Hearts diamond is a good example. After all, the inclusions are readily and immediately visible without magnification.
According to the Gemological Institute of America (GIA) the primary inclusions are crystals and needles. As a matter of fact, the primary inclusions are mirroring around within the body of the diamond.
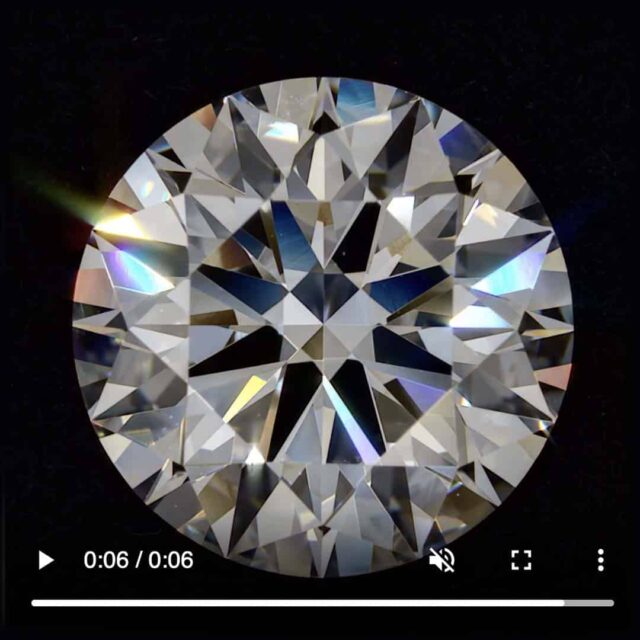
In that case, this I1 clarity diamond looks much busier than it does on the plotting diagram. That is why it is a good idea to have a clarity photograph or video.
As a matter of fact, there is only so much you can tell from the plotting diagram. After all, the inclusion map on the lab report shows the diamond in one dimension.
Under those circumstances, the depth of the inclusions within the crystal is unknown. Although that may be true, the video makes it possible to determine the location.
Included: The Inclusions within I1 Clarity Diamonds are immediately and readily visible without magnification.
Essentials of Diamond Clarity Grading:
Diamond clarity inclusions are the internal characteristics within a diamond. Any "flaws" that occur on the outside of the diamond are commonly known as blemishes.
In most instances, you will need higher degrees of magnification to identify the inclusions. However, it might be possible for you to see "clarity characteristics" with "the naked eye" in lower clarity diamonds.
Depending on your perspective, you might not mind being able to see the inclusions without magnification. Many people choose to accept clarity characteristics as a natural part of the stone's structure.
Other people prefer not to see anything with the naked eye, and some don't want to see anything through magnification. We don't have a dog in the fight so-to-speak. However, we want to ensure you understand the different types of inclusions.
What Diamond Clarity Inclusions are Good/Bad?
In other words, the extent of the inclusions determines whether they are an issue. At the same time, the viewing conditions will also affect your perception.
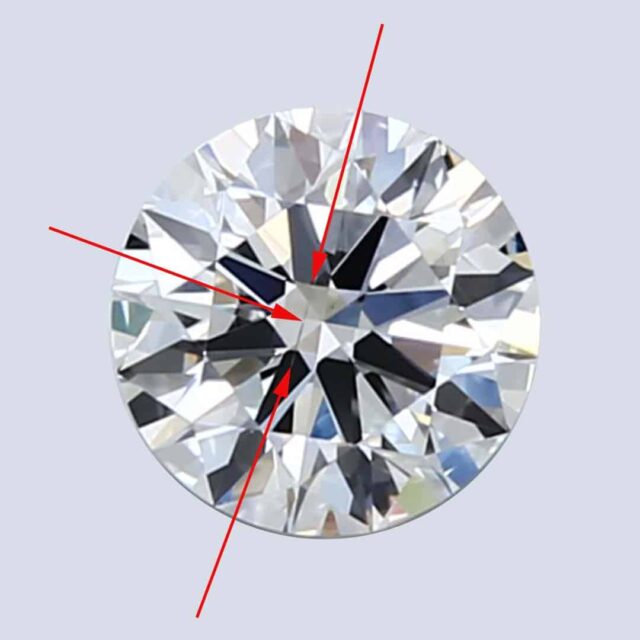
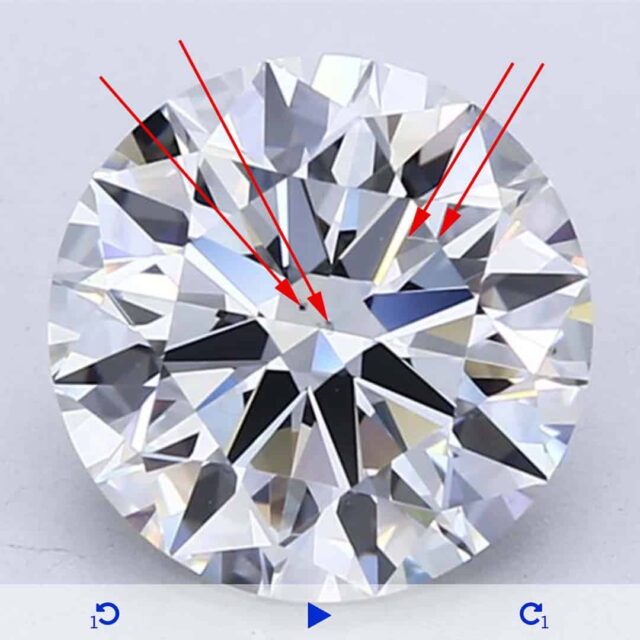
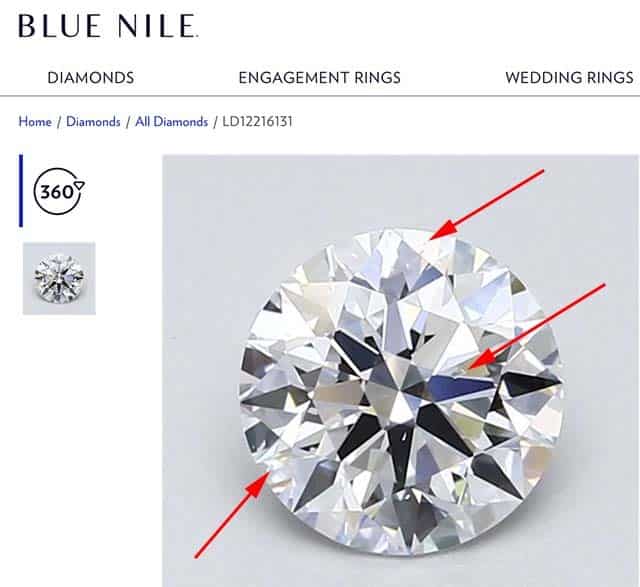
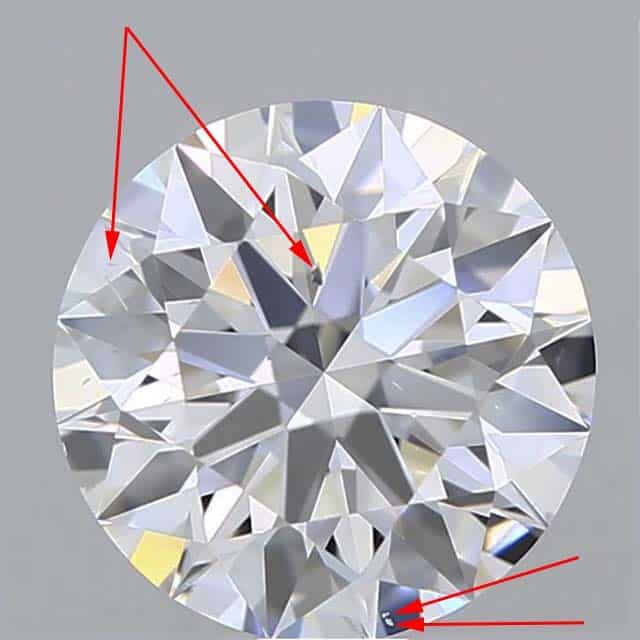
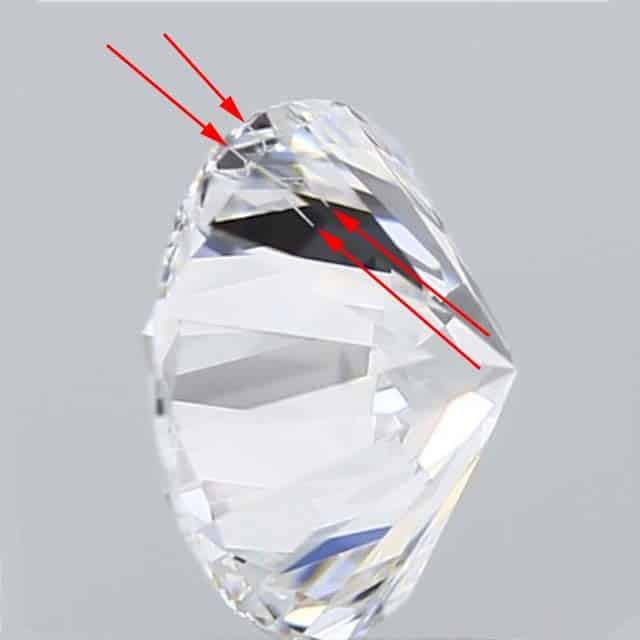
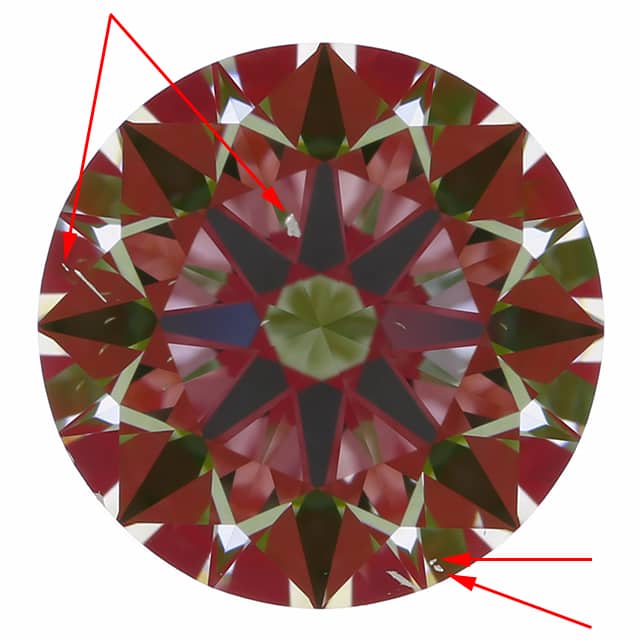
The red arrows in the photograph to the left will make it easier for you to identify the primary inclusions. This 2.51 carat, G-color, VS-2 clarity, GIA Excellent cut round diamond from Blue Nile is shown here at 35x magnification.
In this case, the primary inclusions consist of a cloud of pinpoints, a feather, and a needle-shaped crystal. None of them are visible without magnification.
Under those circumstances, this diamond will appear to be eye-clean in the face-up position. The cloud, crystal, and needle are visible from this vantage point.
However, it's not possible to see the feather at the same time due to its location. That is because inclusions may appear at different depths within the body of the stone.
Many people are concerned when they can't locate all the inclusions indicated on the plotting diagram. However, the plotting diagram only shows the clarity characteristics in one dimension. The actual position of the inclusions will be at varying depths within a three-dimensional object.
Evaluating Types of Inclusions:
This picture shows fifth-generation diamond cutter Brian Gavin using a loupe to grade diamond clarity. As stated previously, we use varying degrees of magnification to evaluate the inclusions within diamonds.
Diamond clarity grades depend on the size, location, extent, and visibility of the inclusions. The availability of high-resolution clarity photographs and video skew our perception of how easy it is to see the clarity characteristics.
As that may be, what we find interesting is that most people don't consider the types of inclusions when buying a diamond. In other words, they might worry about whether they can see the flaws, but not the nature of the inclusions.
We See Things From a Different Perspective:
As professional diamond buyers, we evaluate inclusions from a different perspective. It stands to reason that we're going to consider the visibility of the inclusions. Another concern is whether or not those inclusions present any durability risk.
In other words, some kinds of inclusions can be detrimental to the stone's longevity. Precisely, cavities, chips, etch channels, extensive feathers, knots, and laser drill holes.
There mere presence of the clarity characteristics referenced above is not necessarily an issue. However, it is worth noting that we automatically reject everything on that list except for feathers.
Suffice to say that we are more concerned about specific types of inclusions than others. As for the rest, we evaluate them individually on a case-by-case basis. This set of tutorials intends to show you what to look for and teach you what to avoid.
How Diamond Clarity Photographs Help You Avoid Mistakes:
Modern technology and state-of-the-art imaging make it easier than ever to verify diamond performance online. Although that may be true, some vendors provide better images and more information than others.
Under those circumstances, Brian Gavin Diamonds provides the most spectacular looking ultra-high definition clarity videos available. They also offer the reflector scope images necessary to judge light performance.
Conversely, some of their competitors also provide everything you need to make an informed decision, but others do not. In that case, you'll want to consider the types of images that each vendor provides carefully.
Degrees of Magnification for Diamond Clarity Grading:
The high level of magnification makes it easy to see inclusions in clarity photographs and video. As a result, many people are overwhelmed by the clarity characteristics visible in anything lower than VS-1 clarity.
Conversely, the only reason such minute inclusions appear so prominent is that the clarity photograph shows the diamond at 35x magnification. In that case, it is essential to maintain perspective when evaluating diamond clarity characteristics online.
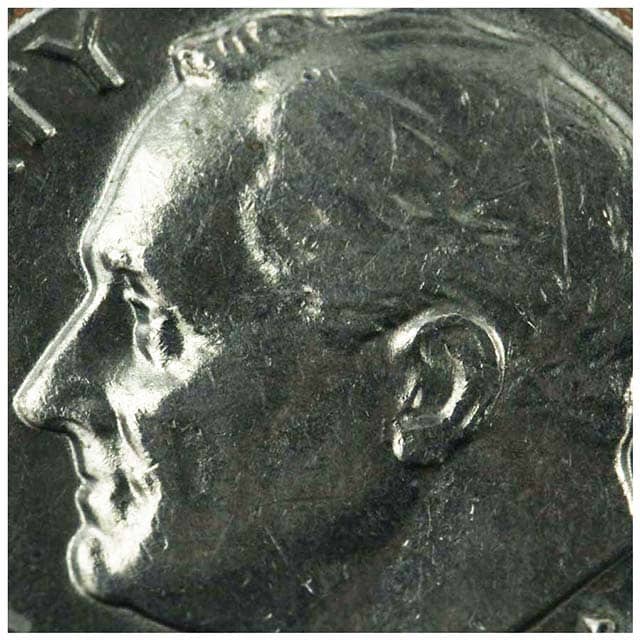
With that in mind, here is a photograph of a U.S. Dime shown on Brian Gavin's imaging system at 35x magnification. A dime's diameter is 17.9 mm in real life, but it looks larger than life in this photo.
Consequently, it's easy to see all the scratches and imperfections on the dime's surface. Similarly, the average diameter of a 1-carat round diamond is closer to 6.5 mm.
That is about the same diameter as the eraser on a standard #2 pencil. In that case, you can hold a pencil up to the picture to gain perspective of the effect that magnification has upon the inclusions.
How Modern Technology Affects Our Perception of Diamond Clarity:
At this point, you have a good understanding of how high-resolution images affect our perception of the inclusions. It is also essential to acknowledge the lack of consistency and limitations of those images.
In other words, you should realize that each vendor is using a different imaging system. It is also likely that other people are taking the images at various times of the day.
There will be variances in brightness, focal depth, resolution, and other things under those circumstances. A key point to remember is that vendors' images intend to highlight the clarity characteristics.
In that case, it would be best if you use the images that vendors provide only to identify the inclusions. Attempting to use them for any other purpose is bound to create confusion unnecessarily.
No Two Inclusions Are Alike:
Consequently, it's important to remember that every clarity grade encompasses a spectrum of inclusion. Under those circumstances, we recommend evaluating each diamond on its own merit. Rather than clumping diamonds together under general classifications.
In other words, no two diamonds contain the same inclusion patterns. Under those circumstances, every diamond is individual and unique. That means that you have to look beyond the clarity grade and evaluate the actual inclusions. Because that is the only way to determine whether the inclusions are acceptable or not.
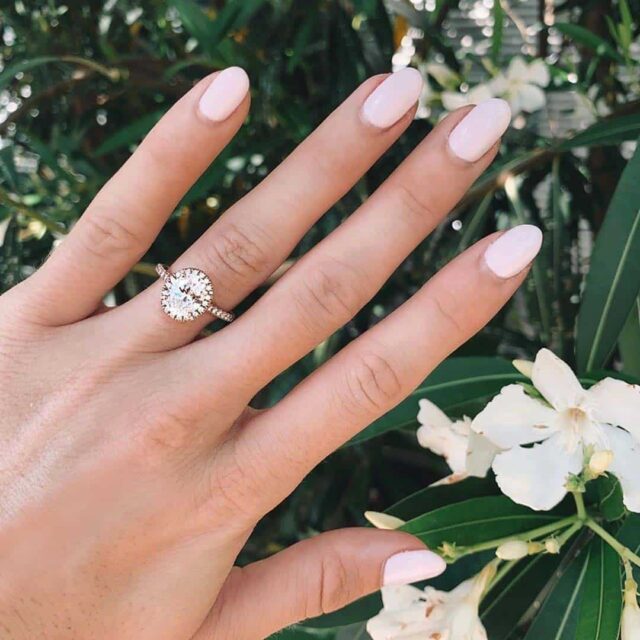
Of course, when people look at their engagement ring, they usually do it like this. From that perspective, the sparkle factor will be more apparent than the inclusions.
Diamond Clarity vs Light Performance:
This 1.08 carat, D-color, Internally Flawless clarity, Black by Brian Gavin diamond Is a much better option. As you can see, the Ideal Scope image is clearly superior.
Under the circumstances, it's fair to assume that the difference in performance is going to be like night and day. After all, the Ideal Scope image for this diamond is not revealing any light leakage under the table facet.
As a matter of fact, this is not surprising given my review of Black by Brian Gavin Diamonds. After all, they exhibit the highest degree of optical precision and even the minor facets are optimized for performance.
Consequently, Brian Gavin is the only diamond cutter in the world with a patent for maximizing light performance in the modern round brilliant cut diamond.
With that in mind, it should be clear why we recommend Brian Gavin so highly. All in all, he produces the most spectacular diamonds we've ever seen.
Diamond Clarity Inclusions To Avoid:
In the first place, I propose that there is no such thing as a bad diamond clarity grade. Rather there are different types of diamond clarity characteristics. And some types of inclusions are more desirable than others. Especially since the size, location, and extent of the inclusions can affect their visibility.
Be that as it may,, there are specific types of diamond clarity inclusions that we automatically reject. That's because the following types of inclusions present a potential durability risk. Although this may be true, our strict adherence to policy does not make those characteristics good or bad.
As a matter of fact, it's merely a reflection of our personal preferences. In addition, we want to help you minimize the risk of financial loss or emotional distress. After all, buying a diamond with inclusions that may affect its durability creates an inherent risk.
Diamond Clarity Characteristics to Avoid:
The Best Types of Inclusions:
As a matter of fact, every inclusion is as unique as a snowflake or your fingerprint. With that in mind, every diamond must be evaluated on its own merits. Under those circumstances, we probably shouldn't make blanket statements about what types of inclusions are good or bad.
However, it also stands to reason that some types of diamond conclusions are more desirable than others. In addition, the size and extent of inclusions changes in according to the position on the clarity scale. In other words, the inclusions in a lower clarity diamond will be larger and more obvious.
Whereas the inclusions in a higher clarity diamond will be smaller and more difficult to locate. As an illustration, our favorite type of inclusions are diamond crystals. After all, they are simply smaller diamond crystals that were trapped within the larger crystal as it formed.
Crystals Are Just Tiny Diamonds:
Although that may be true, diamond crystals can be light or dark in color. For that reason, it may be easier or more difficult to see the inclusions without magnification.
In addition, the size, location, and appearance of the crystal affect the desirability. For example, a small collection of pinpoint size diamond crystals is probably not an issue.
Although, small groups of pinpoint size diamond crystals are referred to as a cloud for a reason. Be that as it may, a large diamond crystal directly under the table facet of a diamond is less desirable.
Especially if the inclusion is darker and the clarity grade is lower. In other words, a crystal that warrants an SI-2 rating will be bigger than one worthy of a VS-2 grade. As such, it will be probably be more visible to the naked eye than a small cloud.
Acceptable Diamond Clarity Inclusions:
In the event that you're shopping for an engagement ring, the following inclusions types are most acceptable:
No Two Inclusions Are Alike:
Once again, I remind you that every diamond is unique and must be evaluated on its own merit. In other words, we might still reject a diamond for these inclusions depending on the nature of the characteristics.
That is why we recommend taking advantage of our Free Diamond Concierge Service. We will review the diamond details and help you evaluate the characteristics. As a matter of fact, we don't care whether it's from a vendor we work with or a local jewelry store.
Be that as it may, Brian Gavin Signature Diamonds offer the best performance. In the first place, the proportions are in the range we recommend. That means that they will produce the highest volume of light return. And exhibit a virtual balance of brilliance and dispersion. Plus, the optical precision is off the charts!
Lab Report Key to Symbols:
In the first place, the diamond grading report contains a key to symbols that indicates the type of inclusions. There may also be a plotting diagram that shows where the inclusions can be found. As a matter of fact, the inclusions are clarity characteristics sometimes called blemishes or flaws.
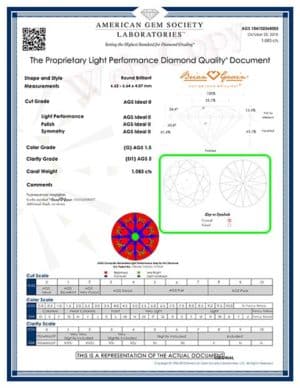
The green section on the left highlights the inclusions within this Brian Gavin Signature diamond. Obviously, the nature of the inclusions determine the clarity grade of a diamond. With that in mind, the type of inclusion, as well as the extent factor into the equation.
In this instance, a few crystals and clouds of pinpoints are the basis for the SI-1 clarity grade. Obviously, this section of our website is for educational purposes only. After all, the inclusions within each diamond are as unique as a fingerprint. In that case, we can only address the nature of inclusions in general terms.
Every Inclusion is Unique:
As a matter of fact, no two diamonds contain the exact same inclusions or formations. Therefore, you should conduct your own due diligence. Because only you can decide what types of inclusions are generally acceptable for you.
The following "examples" are not absolute indications of what different inclusions will look like within other diamonds. Rather, each inclusion type below is a general example of inclusion types in their basic form.
In that case, the inclusions within other diamonds will look different. Therefore, you should consider every diamond on its own merit. Likewise, every shape of diamond has its pros and cons.
Under those circumstances, you'll want to read our diamond shapes buying guide. After all, our speciality is buying diamonds for light performance and our advice varies by shape.
Diamond Clarity Plotting Diagram:
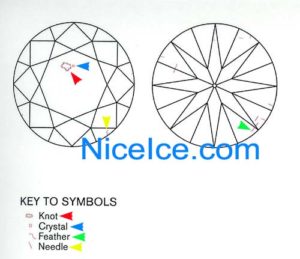
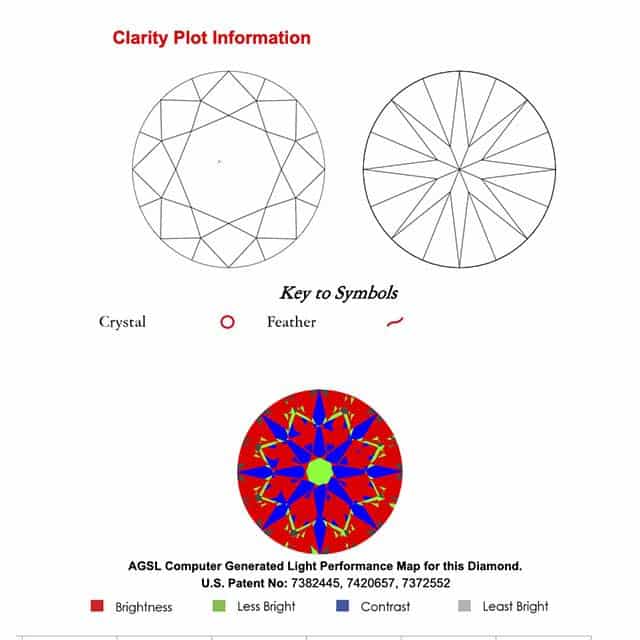
Keys to Symbols on Plotting Diagram.
As a matter of fact, the plotting diagram is the key understanding the clarity characteristics within a diamond. The plotting diagram on the left shows where the inclusions appear within the stone.
As you can see, the crown section (upper half) appears on the left. While the pavilion or lower section of the diamond appears on the right.
If you fold the right side (pavilion) up under the crown section, then you can see how the inclusions align. As a matter of fact, you might imagine that you're making a paper doll.
In which case, you would imagine a fold that runs vertically between the two halves. Under those circumstances, the nine o'clock region of the pavilion aligns with the three o'clock region of the crown.
Plotting the Inclusions:
As you can see, the inclusions are shown within the plotting diagram section where the inclusions appear. At the same time, it's important to realize that you're looking at a one dimensional model. In which case, the position of the inclusions is relative and not absolute or static.
For example, the green arrow in the lower plotting diagram on the right points to a feather. In that case, you might assume that the feather will not be visible in the face-up position. After all, it is well within the lower half of the diamond according to the plotting diagram.
However, the facets of a diamond are like tiny windows and they also act like mirrors. In which case, the inclusion may be visible from several different vantage points or not at all.
Consequently, diamonds are faceted to make it harder to see inclusions in the face-up position. Under those circumstances, you might find it easier to see inclusions from a side profile.
Additional Pinpoints, or Clouds Not Shown:
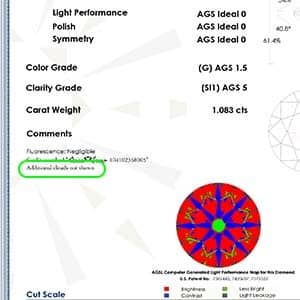
Additional Clouds Not Shown.
As a matter of fact, it is quite common to not plot all of the inclusions that appear within a diamond. Generally speaking, it is common practice not to plot minor inclusions.
In other words, if an inclusion can not reliably be used for identification purposes. Under those circumstances, you might see a comment like:
Comments on Lab Reports:
In many cases, you are likely to encounter the following types of comments on diamond grading reports:
As a matter of fact, the labs routinely use these types of comments rather than plot the inclusions. Arguably, this might be because indicating those inclusions might make the plotting diagram look too busy.
However, the labs indicate that it is because the inclusions are not suitable for identification purposes. Needless to say, I'll leave it up to you to decide, but that won't change anything.
Be that as it may, the inclusions are likely to be minimal and of no consequence. Otherwise, the plotting diagram would indicate the clarity characteristics.
With that in mind, I tend to view the comments on the lab report as an advisory. As such, I will take them under advisement and carefully study the clarity and reflector scope images.
Types of Diamond Clarity Inclusions:
The following is a list of the most common types of diamond clarity inclusions. As a matter of fact, the majority of them like clouds, crystals, small feathers, and naturals are usually of no consequence.
Generally speaking, we avoid diamonds that contain bearding, cavities, chips, etch channels, knots, or laser drill holes. After all, those types of inclusions are either unsightly or may present a durability risk.
Chip:
As a matter of fact, it is possible to chip a diamond even though it is the hardest mineral substance. The key to the problem is actually hidden in that last sentence in plain site. In other words, diamond is the hardest mineral substance, but there are other things that are harder.
In the first place, a chip on a diamond is exactly what is sounds like. With that in mind, a chip occurs when a piece of the diamond breaks off. In other words, the diamond has been damaged or chipped and a small piece is missing.
In the second place, a diamond chip might refer to a diamond that is so small that it looks like a chip. Obviously as it pertains to diamond clarity grading, the chip we're referring to is damage. By the way, both types of diamond chips are nouns.
How Can Diamonds Chip?
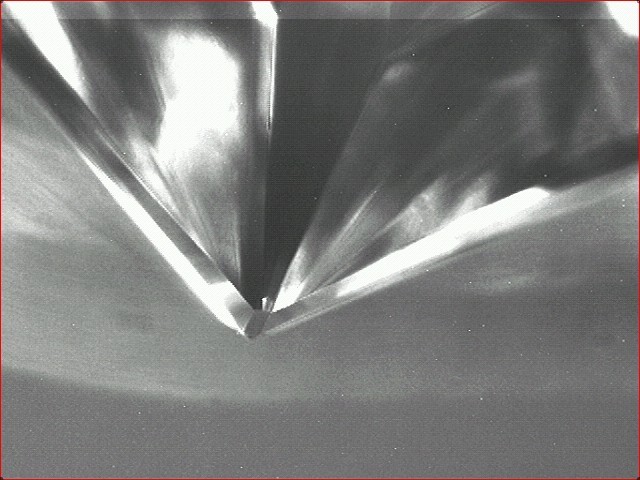
Princess Cut Diamond Chipped Culet.
A chip in the surface of a diamond is usually the result of a some kind of impact. For example, the chip on the bottom of this princess cut diamond was caused by a downward impact.
A chip in the surface of a diamond is usually the result of a some kind of impact. For example, the chip on the bottom of this princess cut diamond was caused by a downward impact.
In this case, the force was strong enough that the diamond pushed down into the setting. The pressure was sufficient enough to chip the bottom point known as the culet.
As a matter of fact, people frequently request to have their diamond set as low as possible in the prongs. However, chips like this are the reason we like to leave a little open space beneath the culet.
In addition, it is normal for a diamond to move down a little when the prongs are being set. Under those circumstances, the extra space acts as a pad that allows for the movement. Thus, the risk of accidentally chipping the diamond during the setting process is less.
Are Chipped Diamonds Recut?
In the first place, most diamond chips are minor and polishing the diamond can remove them. Depending on the extent of the chip, the loss of carat weight is likely to be minimal. However, more extensive chips may require that the entire diamond be re-cut to retain balance.
Recutting a diamond to repair a large chip can result in a substantial loss of weight. In fact, as much as a third to a half of the carat weight or more may be lost. In addition, chips in a diamond might pose a durability risk to the longevity of the stone. As a matter of fact, a chip in a diamond is like one in a windshield. In other words, there is a risk that the damage may spread.
For that reason, we automatically reject any diamond that contains a chip.
Diamond Crystals Inclusions:
As a matter of fact, crystals are my favorite type of inclusions within a diamond. That's because they are just tiny diamonds that were trapped within the larger crystal as it formed. With that in mind, they are like tiny ice crystals trapped within a larger ice cube in your freezer. In other words, diamond crystal inclusions are no big deal.
In fact, some of our clients describe the diamond crystals within their diamond as baby diamonds. As a matter of fact, that description is a pretty good way to look at it. Consequently, you will see that diamond crystals come in different shapes and sizes. With that in mind, diamond crystals are named for their size and shape:
Diamond Pinpoint Inclusions:
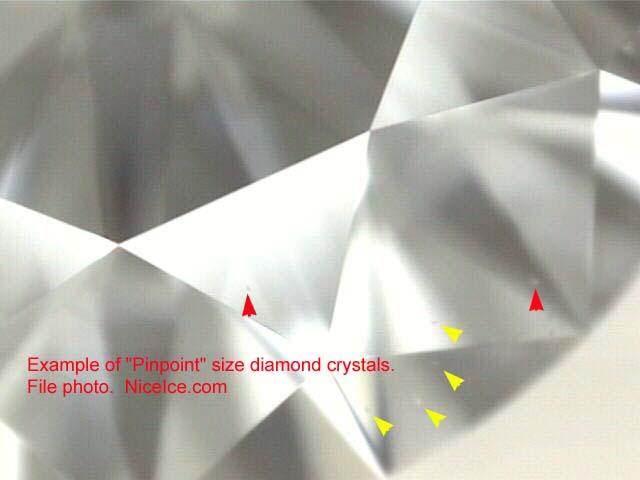
Pinpoint Size Diamond Crystals.
A pinpoint is a tiny diamond crystal that looks like a pinpoint of light as seen through magnification. With that in mind, pinpoint size diamond crystals are literally of no consequence.
As a matter of fact, I think they look like sparkling specks of dust or constellations of stars. At the same time, it's common for pinpoint size diamond crystals not be shown on the plotting diagram.
After all, their minute size makes them difficult to locate with any degree of accuracy. Under those circumstances, you might see the comment "Additional pinpoints not shown" on the lab report.
This picture shows a few normal sized diamond crystals as indicated by the red arrows. In addition, the yellow arrows point to three pinpoint size diamond crystals that are also present.
As you can see, these diamond crystals are of no consequence even at this level of magnification. Consequently, the pinpoints are indicated by three small red dots that are the size of a pinpoint.
Clouds of Pinpoints:
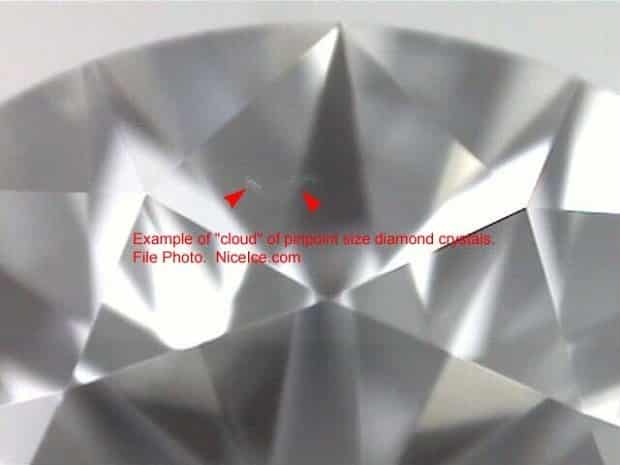
Cloud of Pinpoint Size Crystals.
In the first place, a cloud is nothing more than a small group of pinpoint size diamond crystals. With that in mind, a cloud usually consists of three or more pinpoints that are within close proximity.
Under the circumstances, you'll find that most clouds are of no consequence. After all, the pinpoints tend to be translucent and most clouds are quite small. However, if a cloud covers a significant portion of the diamond it might be a reason for concern.
After all, a large cloud might impact the light return or sparkle factor. Of course, this type of negative consequence usually only occurs in lower clarity diamonds.
That is because the size or extent of the inclusions determine the clarity grade. In that case, a larger formation of pinpoints warrants a lower clarity grade.
Clouds (diffused light source):
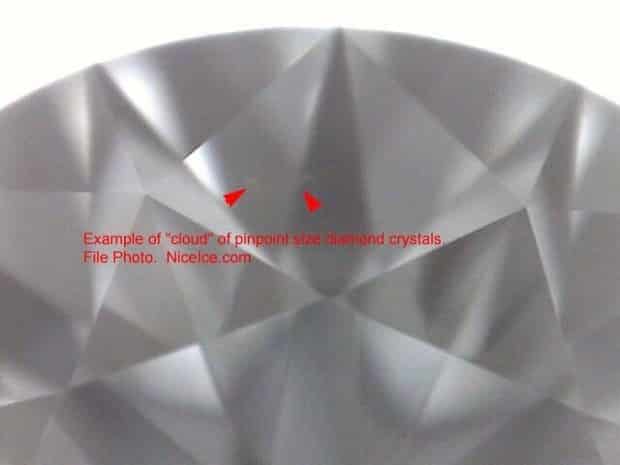
Cloud of Pinpoint Size Crystals.
As a matter of fact, it is highly unlikely that clouds will be an issue in clarity grades of VS-2 or higher. However, substantial clouds can be an issue in diamonds that are SI-1 and lower in clarity. Consequently, I am repeating myself here intentionally.
With that in mind, you should carefully consider the extent of clouds within any diamonds you are considering. As shown above, clouds are shown on the plotting diagram as formations of small red pinpoints.
If the plotting diagram indicates clouds that cover an extensive portion of the diamond, then ask me to look it over.
Clouds (normal light source):

Pinpoint Crystals Form a Cloud.
The photograph on the left shows a cloud of pinpoints as seen using a normal light source. Whereas the two preceding photographs show the cloud as seen through a diffused light source.
In this case, the magnification is higher so that you may see the inclusions more easily.
As you can see, this cloud formation is more dense, but it is still translucent. Under the circumstances, some people might find this alarming.
However, you have to remember that you’re looking at the diamond at about 35x magnification. It is highly unlikely that a cloud like this will have any impact on visual performance.
Clouds of Pinpoints (diffused light source):

Pinpoint Crystals Form a Cloud.
As can be seen, the visibility of the inclusions varies depending on the light source. In both of these examples, the clouds shown are minimal and of no consequence.
In other words, minor clouds like these are no reason for concern. After all, the clouds are translucent and are only visible using higher degrees of magnification. Although this may be true, the next two photographs show clouds that are more extensive.
As a matter of fact, the clouds within that SI-2 clarity diamond are pretty significant. Under those circumstances, the SI-2 clarity diamond below is not one that I recommend buying.
Extensive Clouds Diamond Clarity SI2:
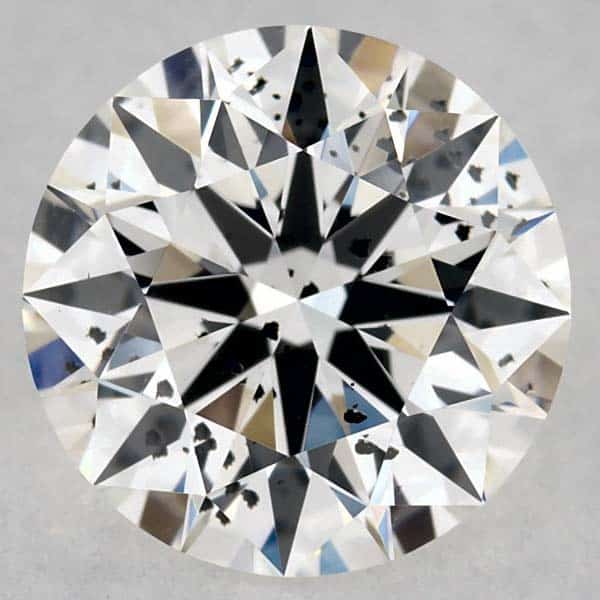
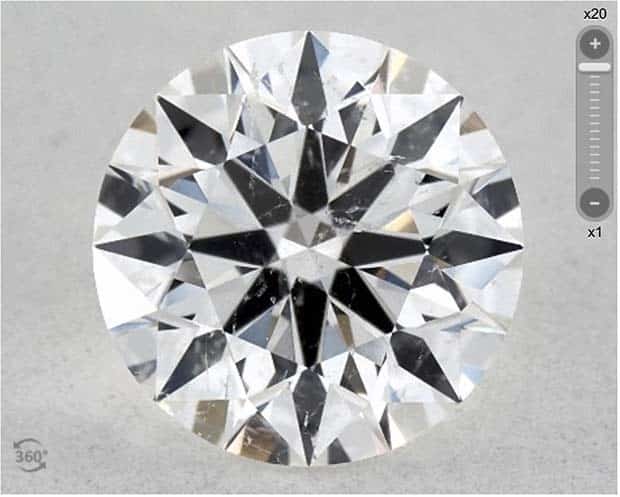
As you can see, the cloud within this SI-2 clarity diamond from James Allen is extensive. In this case, the photograph shows the cloud of pinpoints at approximately 20x magnification.
From this vantage point it is clearly evident that the cloud cover is substantial. In the event that a cloud covers a large area of the diamond, it might affect the light performance.
After all, it stands to reason that a high concentration of pinpoints can interfere with the passage of light. Under those circumstances, I do not recommend diamonds like this to my clients.
Obviously, there are lots of other diamonds available, so why take the risk? Although that may be true, most people think more about diamond carat weight.
Ideal Scope Image Reveals Clouds:
As you can see, the extensive cloud of pinpoints is more evident in this Ideal Scope photograph. From this perspective, it's easy to see why I would not recommend purchasing a diamond like this.
After all, the cloud of pinpoints clearly covers the vast majority of the diamond. At the same time, it's easy to see how the high concentration of pinpoints is affecting performance.
Obviously, the extent of the clouds within this diamond are making it look cloudy. However, smaller clouds of pinpoints might be difficult to locate even under higher degrees of magnification.
This is why it is important to evaluate every diamond on its own merits. Because the individual nature of the inclusions must be taken into account as part of the evaluation process.
Needle Shaped Diamond Crystals:
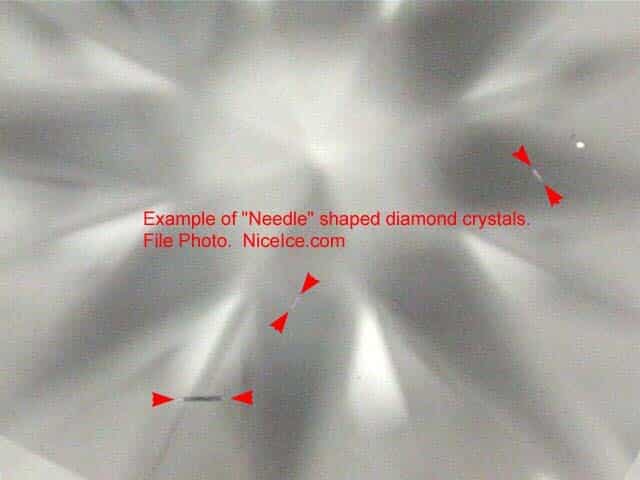
Needle Shaped Diamond Crystals.
In the first place, a needle is just a long, thin diamond crystal. In other words, it looks like a needle, hence the name. Whereas other diamond crystals might be more circular or asymmetrical in shape.
As a matter of fact, needle-shape diamond crystals are nothing to worry about. Consequently, you will find that most needle-shape diamond crystals are extremely difficult to find.
That's because they tend to be very thin and are usually translucent. The photograph on the left shows several needle-shaped diamond crystals as highlighted by the red arrows.
In this case, the needles are located under the table facet of the diamond. Consequently, they are shown here as seen at 40x magnification under a diffused light source.
Cool Looking Crystals:
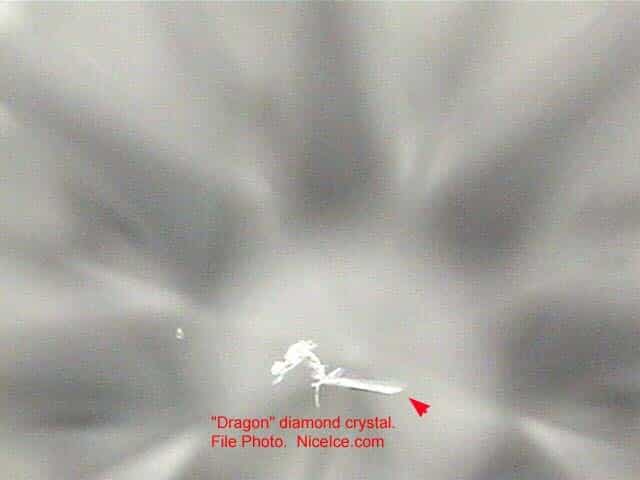
Dragon Shaped Diamond Crystal.
On occasion, I run across some pretty cool looking inclusions inside of diamonds. For example, I think the crystal inclusions within this diamond look like a dragon. Obviously, I might have spent too much time staring up at the clouds as a child.
At the same time, it's easy to see why diamond crystals are my favorite type of inclusion. After all, no other type of clarity characteristic has the potential to excite the imagination like this.
As a matter of fact, I'm not the only person who finds this type of thing interesting. Many of our clients have purchased diamonds like this solely based on the presence of these types of inclusions.
Diamond Crystal Formations:
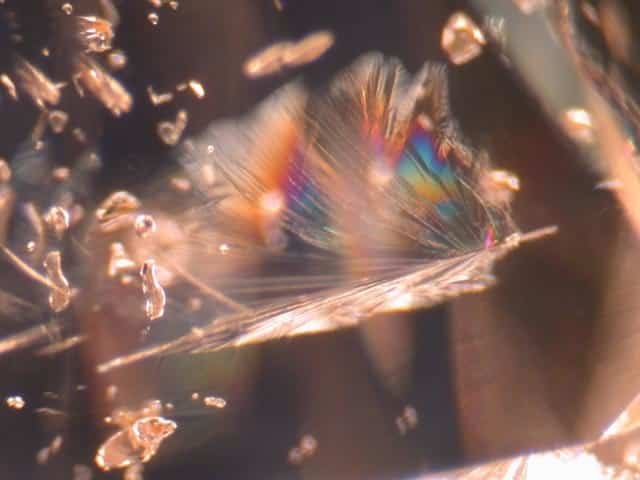
Diamond crystal looks like a flying fish.
In this case, I think that this diamond crystal looks like a butterfly taking flight. On the other hand, another member of our staff thinks it looks like a fish.
As a matter of fact, we usually take our pictures in black and white to make it easier to see the inclusions.
However, this diamond crystal looks more interesting in color, don't you think Under the circumstances, the lighting environment gives the diamond a slight brown tint.
However, the light brown color is strictly the result of the lighting conditions. Be that as it may, don't you just love how the smaller crystals look like bubbles? With that in mind, may we present a butterfly-fish swimming in bubbles?
Fairy-like Diamond Crystal:
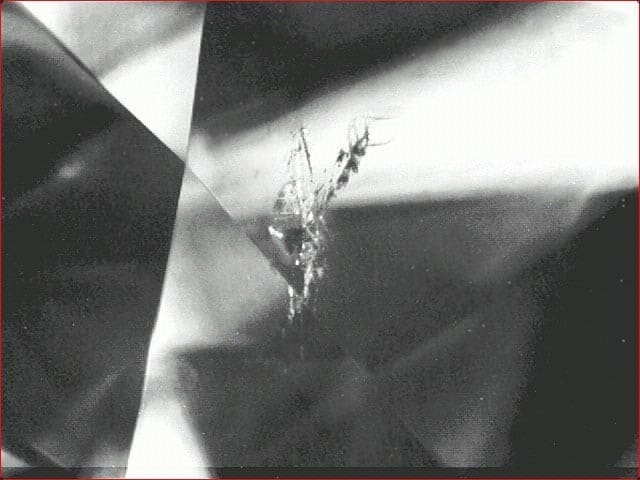
Diamond crystal looks like a fairy.
Under the circumstances, it's rather obvious why we like diamond crystals so much. After all, no other type of inclusion is likely to tantalize the senses like a crystal.
With that in mind, we kind of think that this one looks like a magical fairy. What do you think? All right, I'm going to level with you. Here in the office, the comments range from it looks like a fairy to it looks like a hummingbird.
Be that as it may, by the end of the day, we all agreed that it's like the artwork from the Led Zeppelin album The Song Remains the Same.
The Song Remains the Same:
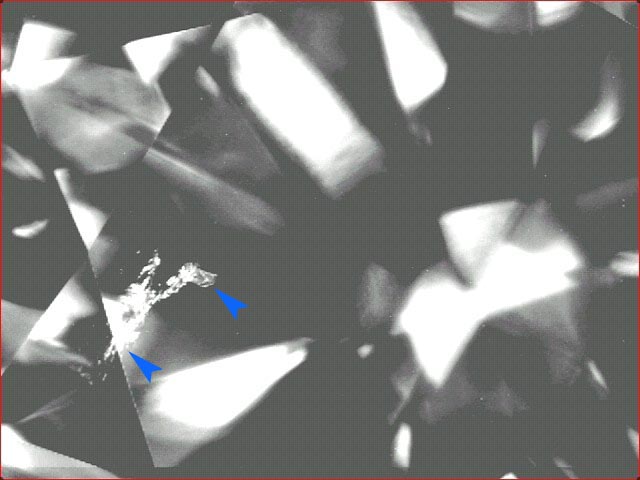
Fairy hummingbird looking diamond crystal.
With that song rolling in our heads, we all decided that it was time to go home. As a matter of fact, it was a Friday afternoon and we were looking for an excuse to go home anyway.
However, we didn’t all go home, because I’m still sitting here, typing. After all, the show must go on even though it's Friday and I'm clearly punch drunk.
The picture to the left shows the Led Zeppelin Fairy Hummingbird Diamond Crystal Formation (tribute band logo). It is shown here as seen through our Gem Scope using 40x magnification.
By the way, this level of magnification will make a regular size household ant look like Godzilla. (More on that concept in a moment).
Diamond Crystal Grasshopper:
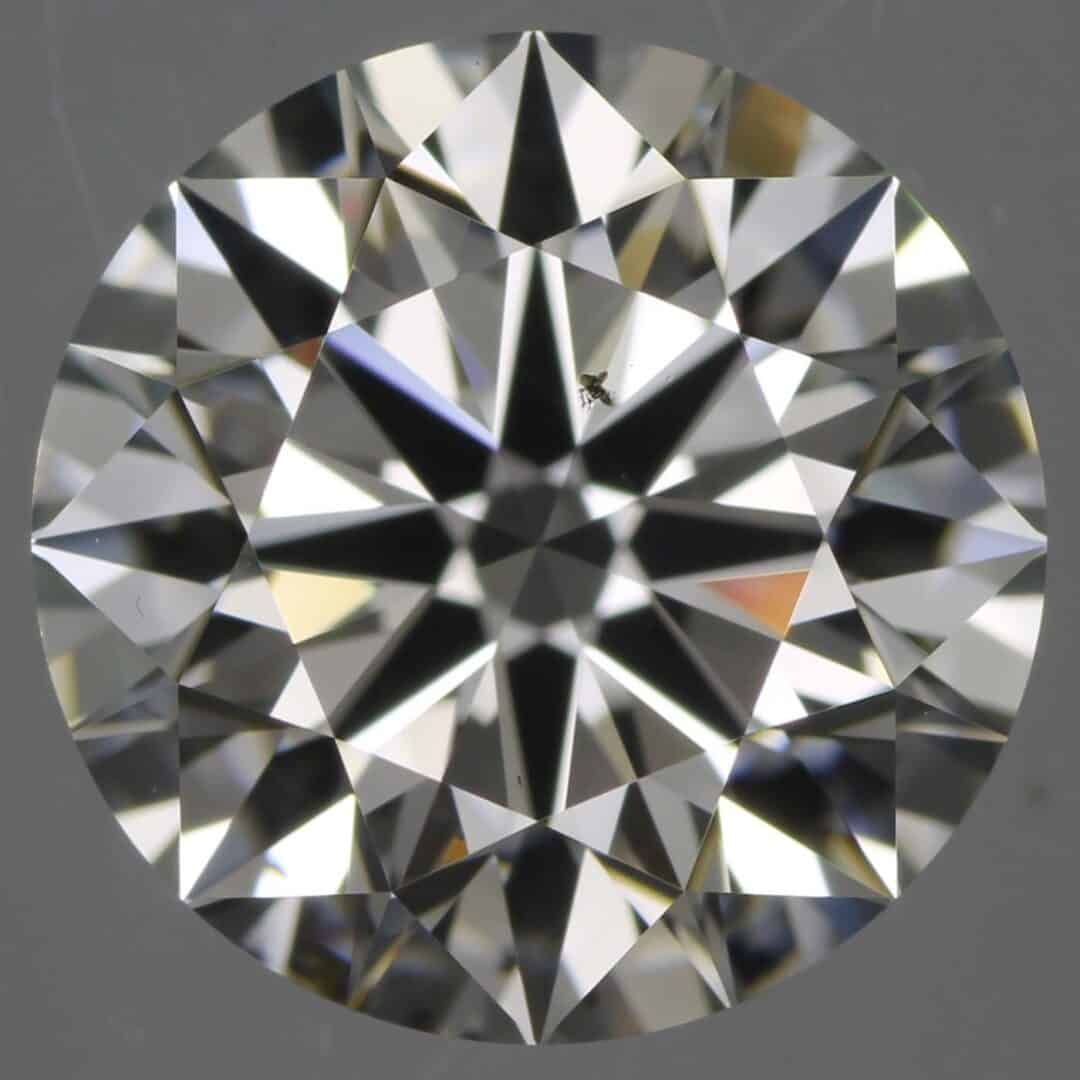
So, what about the inclusions within this 1.24 carat, F-color, SI-1 clarity, GIA Excellent cut round diamond from Blue Nile? As a matter of fact, I think that this crystal looks like a grasshopper in this clarity photograph.
The diamond crystal is visible within the table facet in the relative one o’clock region. By the way, we haven't talked much about diamond cut quality in this article.
However, the range of proportions and degree of optical precision are important factors to consider.
After all, that is what is going to dictate the volume of light return and the sparkle factor. As a matter of fact, the inclusions are less noticeable in diamonds that exhibit higher degrees of performance. That makes sense, doesn't it?
Real Ant @20x Magnification:
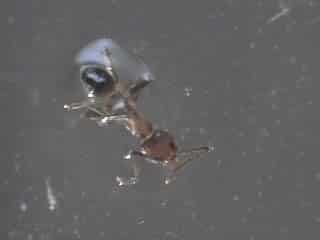
By chance, were you one of those kids who ran around looking at everything under a magnifying glass? If so, then you're going to love this picture of a California black ant under 20X magnification.
Perhaps now you can see how the magnification we use to photograph diamonds makes an ant look like Godzilla. In case you're wondering, we took this photograph to illustrate degrees of magnification.
Obviously, you might be wondering why we would photograph an ant under these conditions. As a matter of fact, I told an attorney that the inclusions inside a diamond were about the size of a hair an an ants' ass.
Of course, he responded by saying that answer was rather vague. So, here you go, we rest our case. Thankfully, he didn't ask how big the ant was or I'd have to measure it.
"Crystals" In Lab Grown Diamonds:
As a matter of fact, there can be differences between crystals found in natural and lab-grown diamonds. In the first place, I'm sure you'll agree that there is a structural difference between a crystal and cavity.
Although this may be true, that reality is not stopping some gemological laboratories from referring to cavities as crystals.
When they vaporize "the diamond seed" to begin the lab-grown process it leaves behind a cavity. For some reason, the gemological labs refer to this cavity as a crystal.
Obviously, it goes without saying that a cavity is not the same as a crystal. In this case, the cavity is created by the diamond seed exploding to start the growth cycle.
In contrast, a crystal is part of the natural structure and growth process. Needless to say, it is beyond reason for a gemological laboratory to refer to a cavity as a crystal. With that in mind, I can only imagine that they do so to make lab-grown diamonds seem more palatable.
After all, an open space in the middle of a diamond is nothing like a crystal inclusion that is solid matter. Under those circumstances, referring to cavities as crystals is misleading and confusing.
What Is a Knot in Diamond?
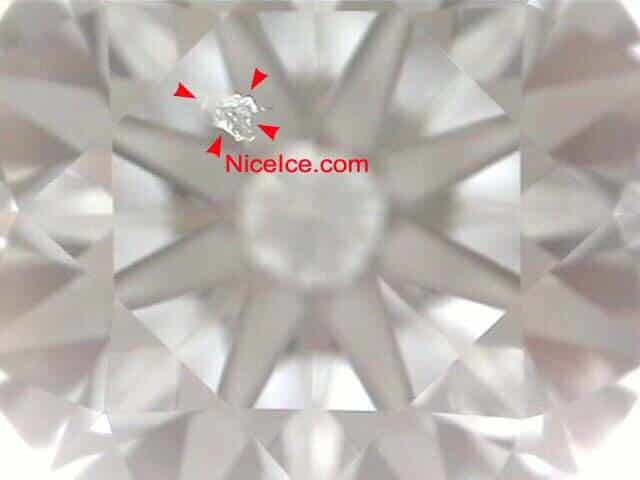
Diamond Knot Inclusion Type.
In the first place, a knot is an included diamond crystal that extends to the surface of the diamond. In other words, it is a diamond crystal that breaks through the surface of the stone.
With that in mind, this shows a knot inclusion as seen through our Gem Scope. In this case, we used a diffused light source to make it easier to see the inclusion.
Under the circumstances, you can't really see how the knot breaks the surface of the diamond. However, you would be able to see the breach if we could photograph the diamond at just the right angle.
In some instances, this type of inclusion resemble raised areas on a facet or group of facets. At the same time, the uneven surface might cause visible differences in the quality of the polish where the knot appears.
Are Knots in a Diamond Okay?
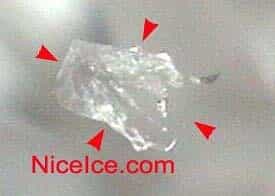
Close-up of Knot Inclusion.
In this photograph, the higher degree of magnification provides an extreme close-up of the knot. As a matter of fact, you might mistake this knot for a crystal because they look similar.
However, the difference is that this knot is breaking through the table facet. Whereas a crystal exists within the body of the diamond and therefore poses no risk of structural integrity.
Remember that a knot is an included diamond crystal that extends to the surface of a diamond. In other words, it is a crystal, but it also breaks the surface. With that in mind, a knot has the potential to create a cavity if it falls out of the stone.
We generally reject diamonds that contain knots because of the potential durability risk.
Feather Inclusions:
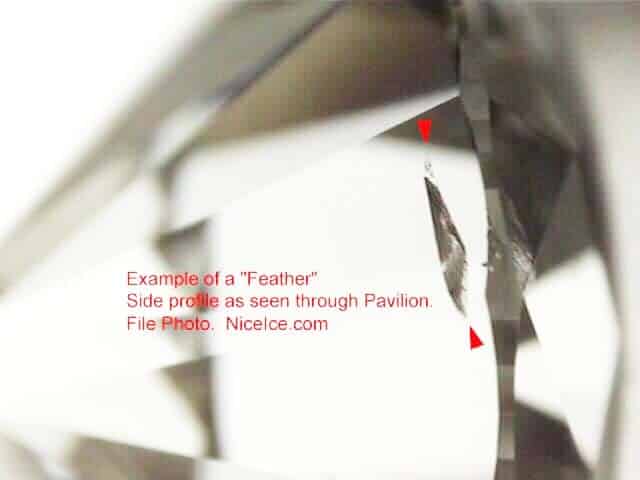
Close-up of a Feather Inclusion.
In the first place, a feather is essentially a minute fracture within the body of a diamond. Obviously, the term "feather" is significantly more appealing than a fracture or a crack.
With that in mind, it's pretty easy to see why the industry calls fractures feathers. Although this may be true, they don't call a cavity a bubble, so I might be way off base.
Okay, that's not quite true either. Because it's rather obvious why they refer to this type of inclusion as a feather. After all, the inclusion that appears between the red arrows does resemble a feather.
Of course, you'll want to remember that not all feather inclusions look like this one. That's because every inclusion is unique and different in its own way. With that in mind, we suggest that you evaluate and consider every diamond on its own merits.
Despite the fact that a feather is a fracture we will use the term feather to describe this type of inclusion. After all, we want to remain consistent with standard industry practice.
Due to their very nature, all feathers within diamonds must be carefully evaluated.
Feathers on Plotting Diagram:
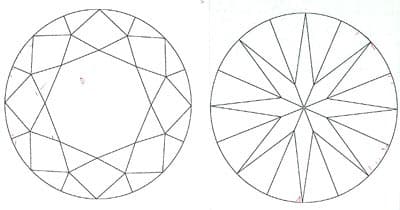
Plotting Diagram for Diamond Inclusions.
In order to indicate the location of feathers on the plotting diagram, we use tiny red lines or hash marks. If you look closely at the edge of the plotting diagram on the left, you will see a bunch of little red lines.
Those tiny red lines indicate the presence of small feathers on the girdle edge of this diamond. Generally speaking, the presence of a few small feathers are not a reason for concern.
However, we feel that extensive feathers or stacks of feathers might pose a durability risk. In other words, feathers that are larger in size or clustered together might be a problem. Consequently, it makes sense to carefully evaluate the nature of any feathers that are present.
Although this may be true, you will notice that we're not saying to avoid feathers entirely. As a matter of fact, we are saying that the feathers within a diamond should be carefully evaluated. After all, some feathers are so small that they are literally of no consequence. Whereas other feathers are more extensive and literally give us the heebie jeebies.
Obviously, this is something that I can help you with. Click on the blue button below and send me a link to the diamond details page. Or, you can send me the diamond grading report number and I'll check it out for you.
Evaluating Durability Risks:
In the first place, you'll want to consider whether the feather breaks the edge of the stone. Secondly, you'll want to determine to what extent the feathers may break the edge.
With that in mind, here's a simple trick that will make it easier to figure that out.
Imagine that the plotting diagram on the lab report is like a paper doll that children play with.
Then imagine that there is a dotted line running down the middle like this:
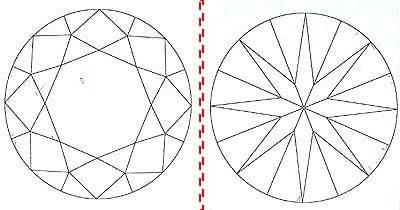
How to Read a Plotting Diagram.
Then fold the plotting diagram along the imaginary dotted line on the left. In that case, the plotting diagram on the left folds under the one on the right.
Under those circumstances, the facets align in the following fashion. The tip of the bezel facet lines up with tip of the pavilion main facet. In other words, the tip of the kite-shaped facet meets up with the tip of the star.
You'll Get This In No Time!
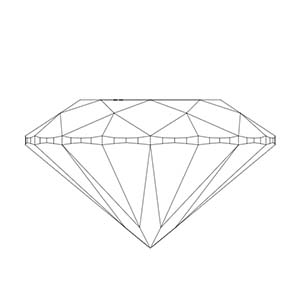
Diagram of Diamond Side Profile.
To begin with, just try to picture the plotting diagram like a paper doll. As such, the two halves stitch together along an imaginary vertical line in the middle. Under those circumstances, the two pieces become one when you fold them together.
In other words, the two halves align to create a two-dimensional model. With that in mind, the side profile of the diamond on the left is a representation of the two-dimensional model.
The diagram on the left is the model of the world that we are trying to create. In order to do so, we just fold the two halves together and use our imaginations. From this perspective, you can identify the geolocation of the feathers within the diamond.
In other words, you'll be able to see the relationship between the feathers in the upper and lower halves.
Under the circumstances, it looks like these feathers run the gamut of the stone from top to bottom. That might not be a good thing if the fractures are substantial.
After all, they could crack further if somebody places too much pressure in that spot. Such as when the pliers crimp down to adjust the prongs during the setting process.
Risk Management 101:
Obviously, the operative word here is "might” because we are not saying that it "will” happen. As a matter of fact, the odds are that the diamond will be set by a seasoned professional. In that case, they should take the inclusions into account before setting the diamond.
Although that may be true, we prefer to err on the side of caution. For that reason, we want you to be aware of the potential risks that this type of inclusions present. That way you can take the feathers into account and decide whether to avoid them or not.
Not All Feathers Are Risky:
Under the circumstances, your first instinct might be to panic and avoid all diamonds that contain feathers. However, the reality is that 99.99999% of feather inclusions do not present a problem.
With this in mind, it is not necessary to avoid diamonds with feather inclusions. Rather, it is enough to be aware that feather inclusions might present a durability risk. In which case, we're really just suggesting that you carefully consider the clarity characteristics.
As a matter of fact, the plotting diagram on the left indicates that the presence of diamond crystals and feathers. This is the Black by Brian Gavin Diamond that I selected for my sons engagement ring.
That might surprise you given everything you've just learned about feather inclusions with diamonds. But remember that not all feathers within diamonds present a durability risk. That means that the majority of feathers within diamonds are nothing to worry about.
In that case, you just need to take a look at the plotting diagram and clarity photographs. Then, you can determine whether the feathers are extensive or not. In this particular instance, the feathers are literally of no consequence.
Examples of Feathers:

Feather in Diamond from the Crown View.
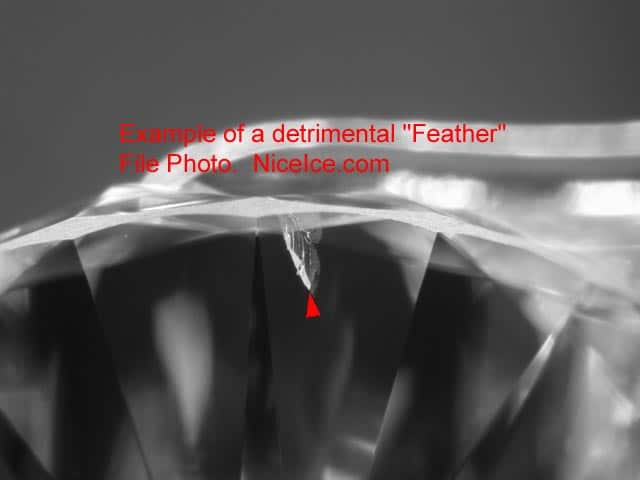
Pavilion View of the Same Feather.
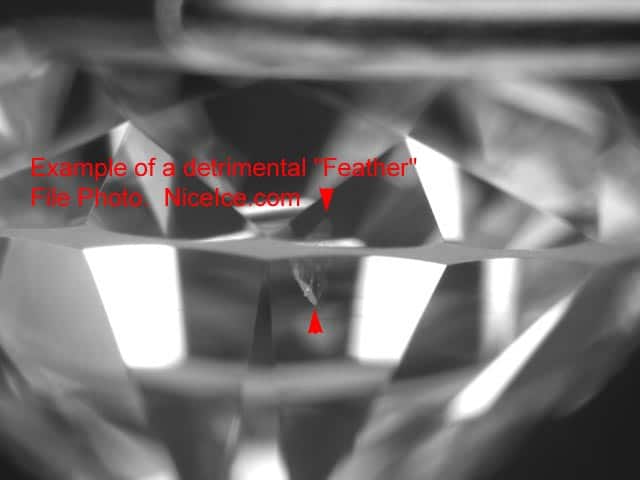
Feather As Seen From Side Profile.
In this case, this is the type of feather inclusions that we tend to avoid. As a matter of fact, this feather doesn't look that bad from the top down perspective. However, perspective is everything and thins look much different from the side profile:
When you look at the feather from a side profile, it's obviously more substantial. In this case, the feather is located near the edge of the stone. It is also clear that it runs the gamut of the stone from top to bottom through the girdle edge.
As a matter of fact, a feather like this just might be a recipe for disaster. Then again, it might never be a problem. However, we prefer to err on the side of caution.
Through the Looking Glass:
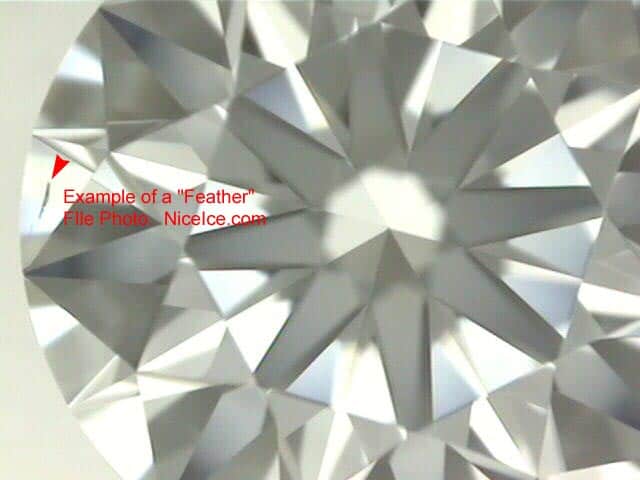
Feather Top Down View.
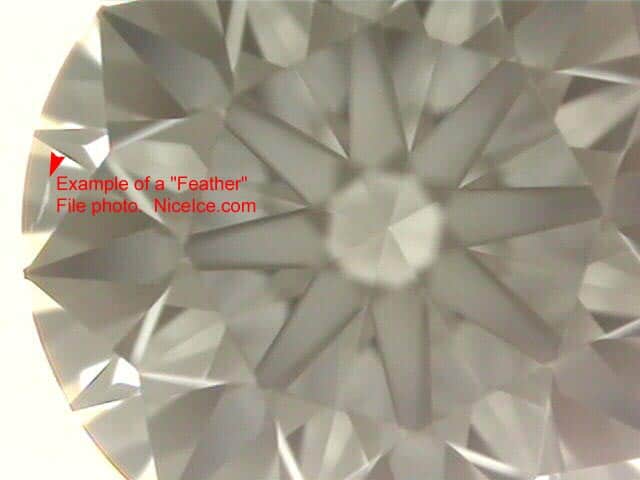
Same Feather Diffused Lighting.
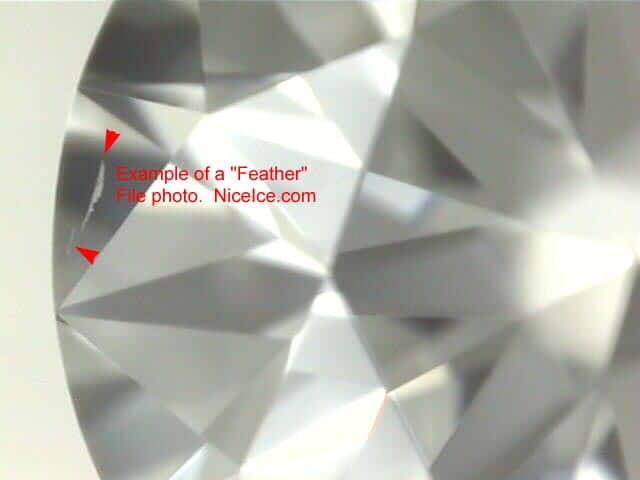
Close Up Normal Lighting.
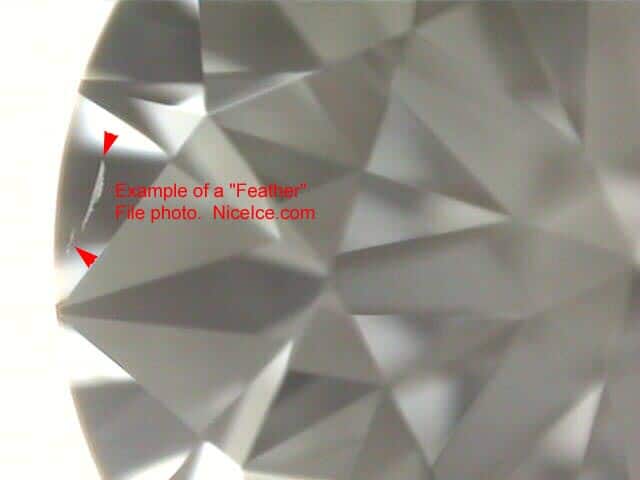
Close Up Diffused Lighting.
In this series of photographs we'll look at the feather from several different vantage points. Obviously, the four photographs below show the diamond from the top down perspective.
In the second and third images the feather is seen under normal lighting. Whereas the second and fourth photographs show the feather as seen using a diffused light source.
In this particular instance, the feather is well within the body of the diamond. Under the circumstances, it's obvious that this feather isn't a durability risk. In fact, a feather like this does not concern us in the least.
Feathers via Side Profile:
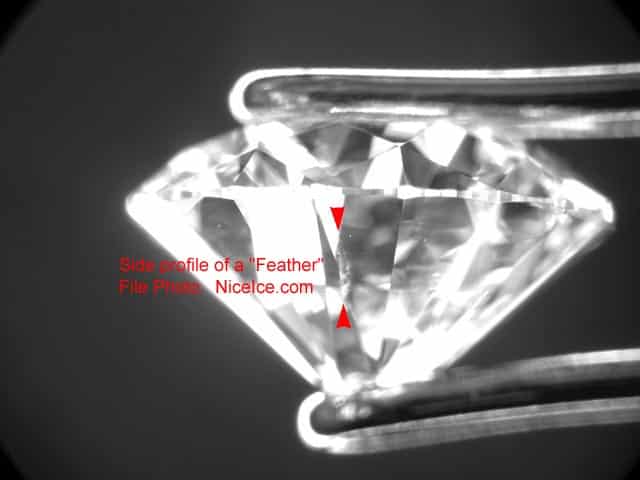
Feather Side Profile.
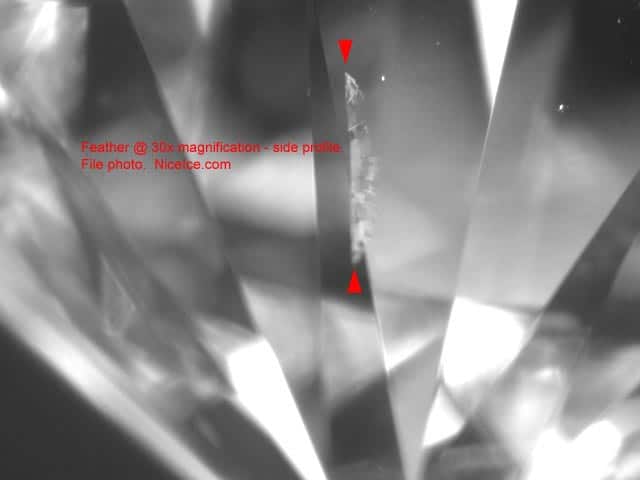
Close Up of the Feather.
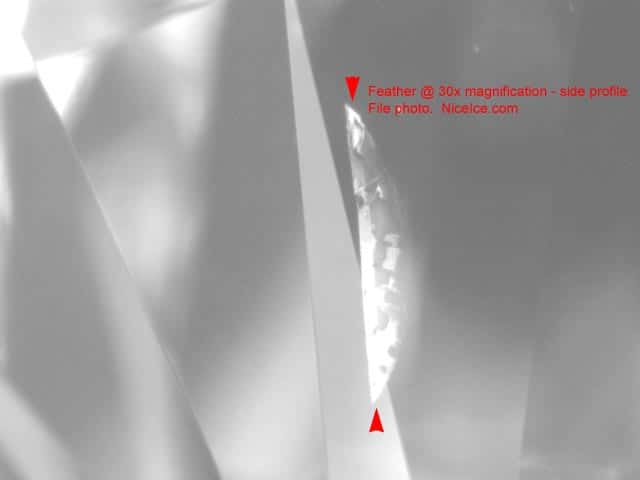
Same Feather Diffused Lighting.
In the first photograph above, the diamond is seen through our Gem Scope using a normal light source. While the second image shows the feather at 40x magnification.
We diffused the light source for the third picture to provide you with a different perspective. At this level of magnification, it's easy to see why feathers are called feathers.
Do you see how this inclusion looks just like the feather of a white bird? Perhaps those early GIA gemologists from the 1950s were onto something.
Photographs of Feathers:
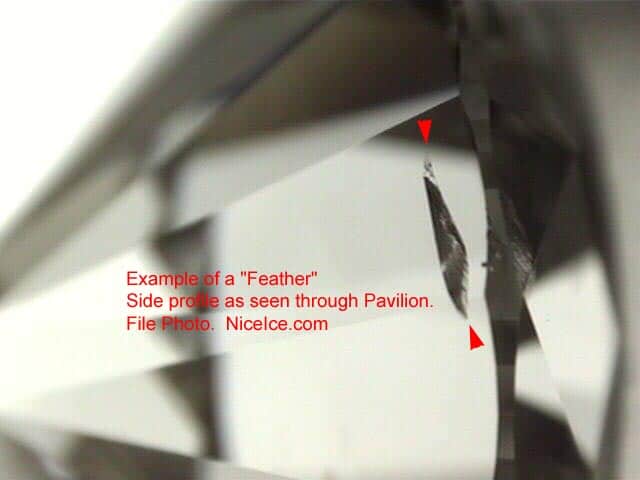
Feather Close-up Normal Source.
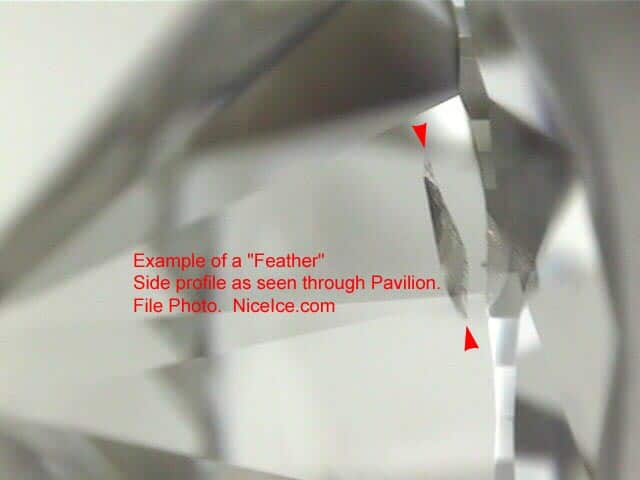
Feather Diffused Light Source.
Once again, we do not feel that this type of feather presents any sort of durability risk. Obviously, this feather is quite extensive and almost spans the entire width of the lower girdle facet.
In this case, the feather inclusion is well within the body of the stone. At the same time, it doesn't appear to exhibit any substantial stress points and should not be an issue.
Naturals & Indented Naturals:
In the first place, a "natural” is just part of the original "skin” of the diamond. In that case, you might be wondering what exactly is the skin of a diamond? As a matter of fact, the skin of a diamond is just the surface of the rough.
In some ways, it's similar to bark on a piece of wood. The odds are that it was left on the diamond to maintain the carat weight. As a matter of fact, they used to commonly appear on "the four corners" of a diamond. In that case, they served as proof to the master cutter that an apprentice did not remove any more rough than was necessary to fashion the diamond.
Diamond Rough Photograph:
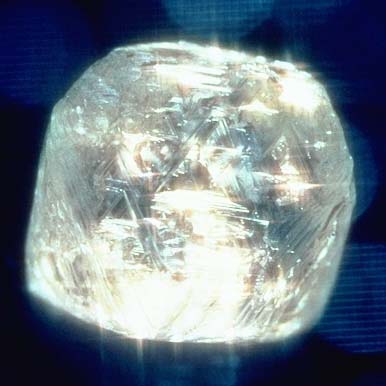
Rough Diamond Crystal.
The photograph on the left shows what diamond rough looks like before being polished. As you can see, it has a rough exterior that is known as the "skin” of the diamond. Essentially the skin is part of the original diamond rough that is the uncut crystal.
In most cases, a natural is left on a diamond for reasons pertaining to weight retention. In other words, removing the natural might reduce the final carat weight significantly.
Under those circumstances, the cutter might lose money, especially if the reduction of weight falls below the carat mark. As a matter of fact, most naturals appear on the girdle edge of a diamond.
Although we have also seen natural inclusions on the minor facets. With this in mind, we consider most naturals to be an acceptable type of inclusion.
However, you should carefully consider the location and extent of naturals during your selection process. After all, only you know what types of inclusions you are willing to accept.
What Is A Natural and Indented Natural?
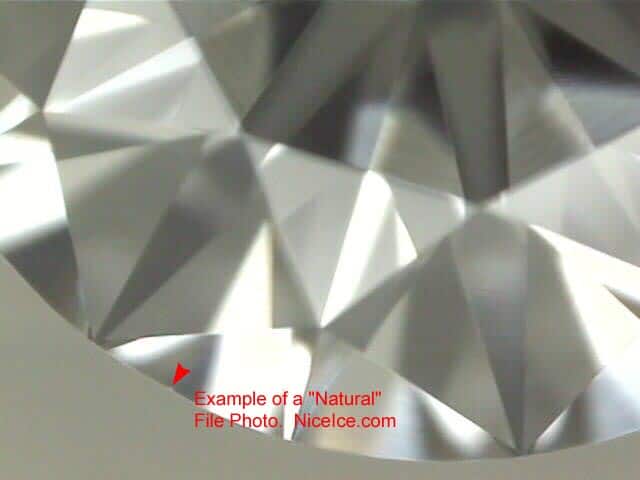
Natural Inclusion Normal Lighting.
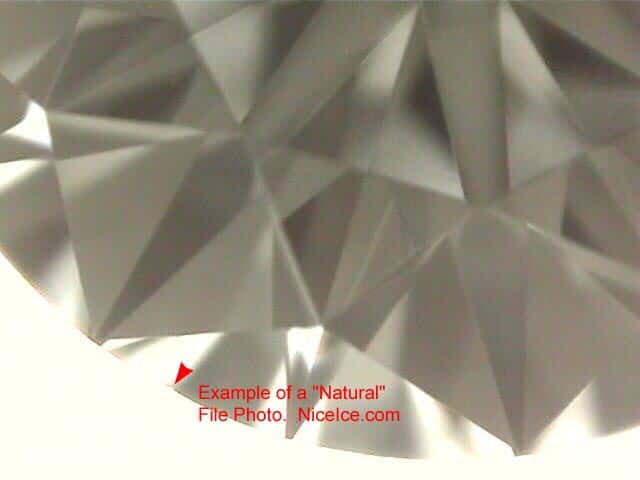
Natural Inclusion Diffused Lighting.
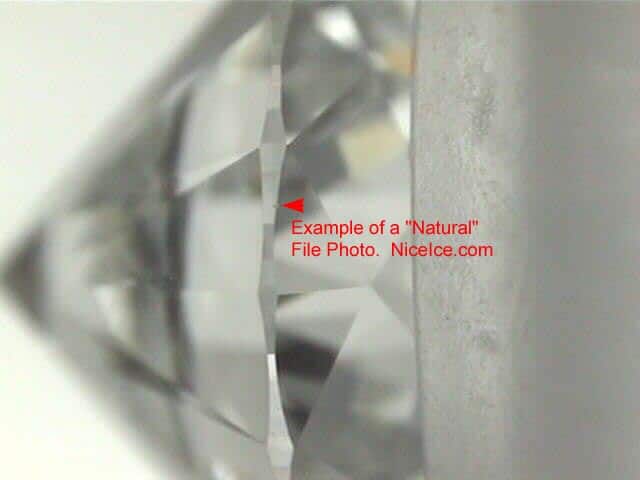
Natural Under Normal Lighting.
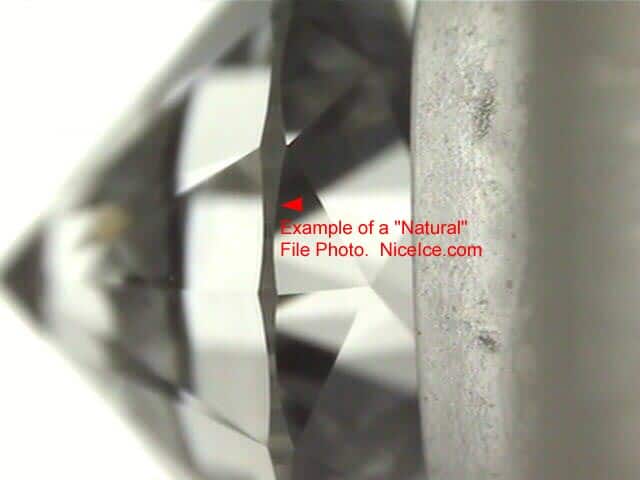
Natural Under Diffused Lighting.
Until recently, it was pretty common to find naturals on the "four corners” of a round diamond. In other words, you might find naturals on the North, South, East and West positions.
That's because they were essential proof to the owner of the factory that the cutter did their job. In other words, they did not remove any more of the valuable diamond rough than absolutely necessary.
This series of photographs focuses on a natural inclusion that appears along the girdle edge of the diamond. In this case, the natural is in alignment with the triangular upper girdle facet. The natural is indicated by the red arrows to make it easier foryou to identify..
The first photograph shows the natural inclusion from a top-down vantage point. In this case, the degree of magnification is about 20x with a normal light source. We diffused the light source with the second photograph to provide you with a different perspective. In the third and fourth photographs show the natural inclusion from the side profile.
Photographs of Naturals:
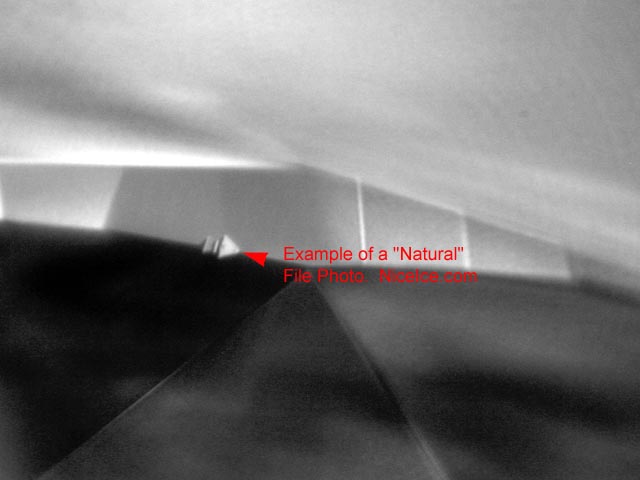
Close-up of Natural Inclusion.
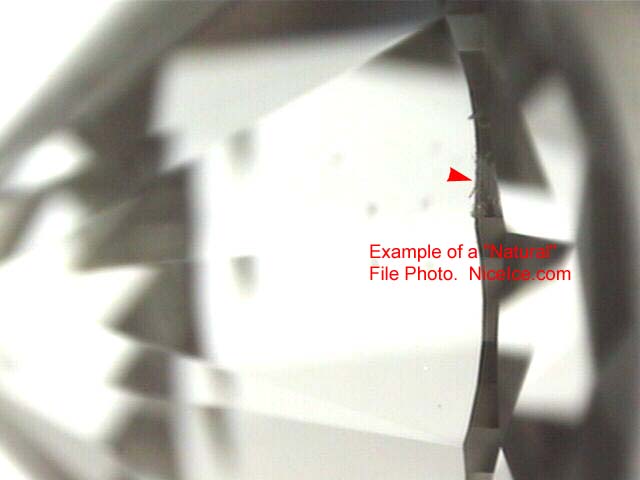
Natural on Girdle Edge.
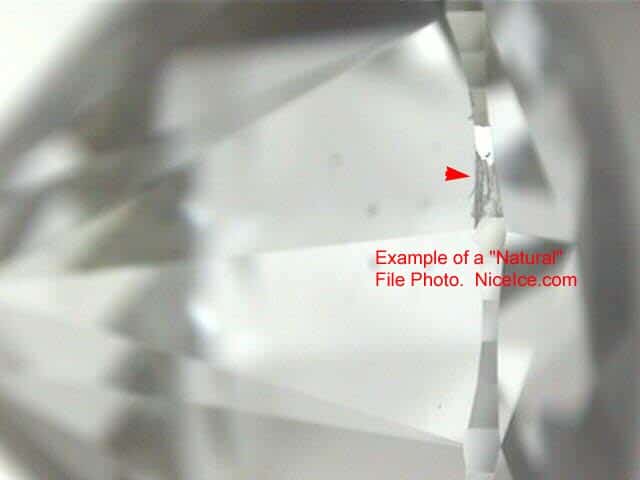
Natural Under Diffused Lighting.
The first picture above is perhaps one of the best photographs of a natural that we've been able to capture. In this case, the crystal structure of the natural is clearly visible.
As a matter of fact, the surface of this natural has been polished. Under those circumstances, it looks crisper than most of the naturals we see. In other words, most of the natural inclusions that you'll see look pretty rough.
With that in mind, you'll see a clear difference between the naturals in these three photographs. The second and third pictures show a natural that looks more rough because it has not been polished.
Indented Natural Diamond Clarity Inclusions:

Indented Natural Inclusion.
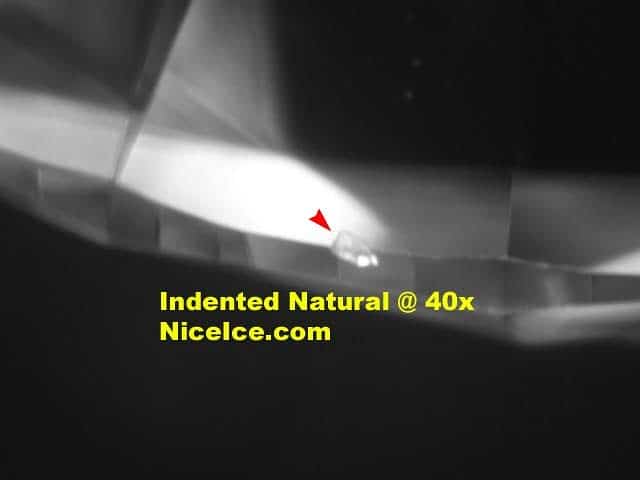
Indented Natural 40x Magnification.
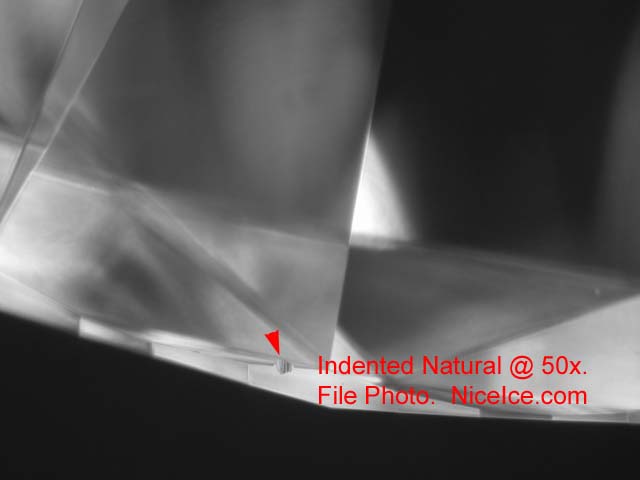
Indented Natural 50x Magnification.
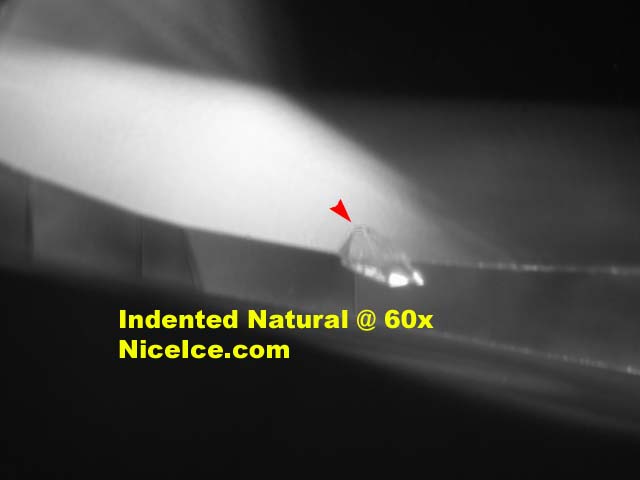
Indented Natural 60x Magnification.
An "indented natural” is simply a natural that is indents into the surface of the diamond. Under those circumstances, it's easy to mistake an indented natural for a chip if you're not paying attention.
That's because you might see the indentation along the girdle edge while using magnification. Or perhaps, you might catch the inclusion with the edge of your fingernail.
Be that as it may, an indented natural inclusion is not a chip and it is no reason for concern. Of course, the extent and location of the inclusion must be taken into account during the evaluation process.
Indented Natural Close-up:
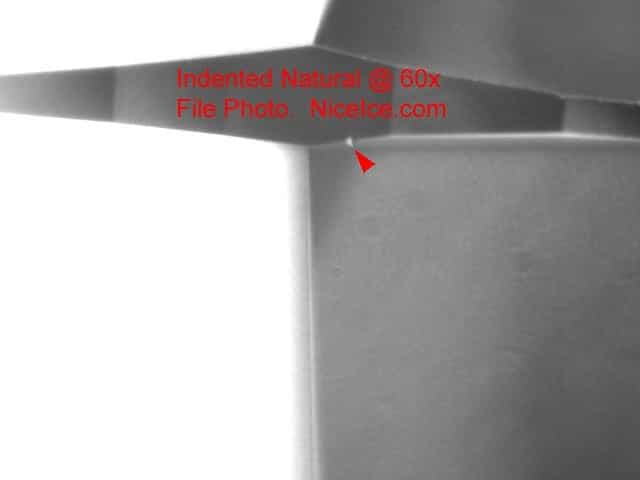
Indented Natural on Girdle 60x.
This is an extreme close-up of an indented natural inclusion as seen using 60x magnification. As is typical for this type of inclusion, it appears along the girdle edge of the diamond.
From this vantage point it is easy to see how somebody might mistake this type of inclusion for a chip. However, if this were actually a nick, pit, chip, or cavity, then it would appear as such on the report.
That makes perfect sense, right?
Bearding, Bruted, Satin Finish:

Bruted Girdle Edge on Diamond.
The girdle edge is the line that appears between the upper and lower halves of a diamond. Needless to say, there are several ways to finish the girdle edge of a diamond.
As a matter of fact, the easiest is to leave the diamond "bruted” because is a rough finish. The origin of the word comes from the process of bruting (cutting) the diamond edge.
Bruting the girdle edge of a diamond involves placing two pieces of diamond rough edge-to-edge in a machine. The edges of the two diamonds beat against each other as they spin at high speed.
When the process is complete, the end result is the bruted satin finish on the left. As you can see the bruted girdle edge of this diamond looks pretty rough.
Needless to say, I'm not very fond of this particular type of finish because of how it looks. In addition, this type of girdle edge is prone to catching dirt and grime.
Polished, Faceted & Inscribed.
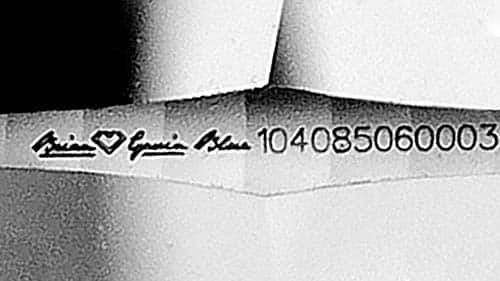
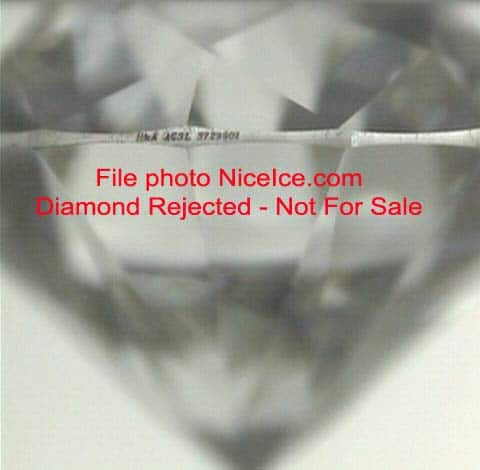
Brian Gavin Blue Inscription on girdle edge.
While some the girdle edge of some diamonds is rough, it will usually be smooth and shiny. That's because most diamond cutters will take the time to polish the girdle edge. As a matter of fact, I personally prefer a girdle edge that is faceted and polished.
Here is a photograph of a thin to medium, faceted girdle edge on a Brian Gavin Blue fluorescent diamond. The photograph on the left shows the inscription at 70x magnification.
As you can see, the inscription includes the brand reference and the lab report number. The intent of the inscription is to provide a reference to the lab report by number. Arguably, it does provide some peace of mind when leaving your ring for repair because it can be used for identification purposes in conjunction with the clarity characteristics.
Never rely strictly on the inscription to identify your diamond because anybody with an inscription machine can forge the logo and report number. With that in mind, you should use both the inclusions and inscription for identification purposes. The blue fluorescence is another identifying characteristic you can use for identification purposes.
However, the lab report number cannot be used to identify you as the owner unless you register your diamond with GEMTRACE™. Full disclosure, we created this solution to enable people to create a bridge based on the inscription that identifies them as the owner.
Bearded Girdle Edge:
Bruted girdle edge of round diamond.
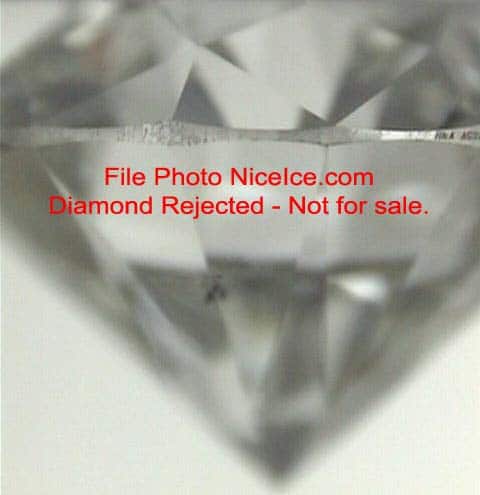
Close-up of bruted girdle edge.
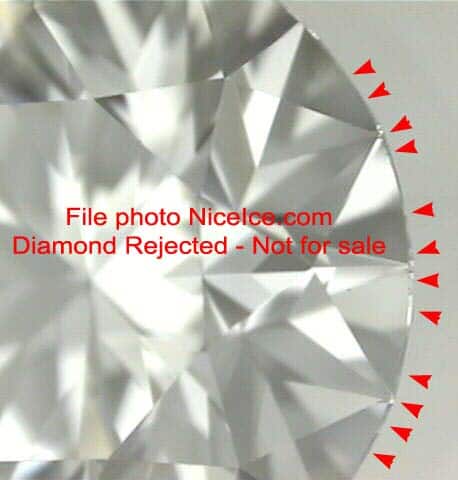
Feathers left by the bruting process.
In the first place, bearding can be dig marks, small feathers (fractures and breaks) that occur along the girdle edge. As you might imagine, bearding is a side-effect of the banging two diamonds together.
In other words, bearding is the end result of bruting a diamond to begin the cutting process. Although that may be true, we reject for substantial bearding because polishing can correct the problem.
The Best Girdle Edge Finish:
In the first place, you can see that this diamond is inscribed with the lab report number. Secondly, the girdle edge looks rough because it is bruted, but not polished or faceted. That is why the girdle edge of the diamond looks rough and unfinished. As a result, the inscription on the girdle edge looks choppy and rough.
The photograph in the middle is an extreme close-up of bruting on the girdle edge of this diamond. The photograph on the upper right shows small fractures left by the bruting process from a top down perspective.
As you can see, the bruted girdle edge of a diamond leaves a lot to be desired. Of course, it's also not likely that you'll spend a lot of time studying the girdle edge. In other words, deciding what type of girdle edge you prefer is largely a matter of preference.
Although that may be true, I definitely prefer the cleaner look of a faceted girdle edge. After all, it makes it seem like the cutter took the time to finish things properly.
Internal Grain Lines:
In the first place, the comment "Internal Graining Not Shown” is not necessarily a red flag. As a matter of fact, it's more of a CYA Statement that the labs use to protect themselves. As such, the comment "internal grain lines not shown" is not necessary a reason for concern.
Under most circumstances, the grain lines within diamond are only visible using higher degrees of magnification. In other words, it's not the type of thing you're likely to see using anything less than 35 - 40X.
At the same time, the visibility of grain lines within a diamond depends on the lighting circumstances. As a matter of fact, we grade diamonds under laboratory conditions using specific light sources. Under those circumstances, we carefully examine the diamond facet-by-facet to identify the characteristics.
A Matter of Perspective:
When you're wearing your ring under normal circumstances, you won't be using magnification. As a matter of fact, you'll see it most of the time from the distance of arms length.
Under those circumstances, minor inclusions like grain lines are of no consequence. Although that may be true, it's still a good idea to understand what a grain line looks like.
In that case, internal graining looks like a transparent line under high levels of magnification. Under those conditions, it might be possible for a grader to see the grain lines of a diamond.
In that case, they will indicate the presence of grain lines on the lab report. However, they are not likely to indicate them on the plotting diagram. After all, it's not likely that you're going to be able to see them using a microscope.
As such, they are not a clarity characteristic that can be reliably used for identification purposes. Hence the comment internal and/or surface grain lines are not shown (on the plotting diagram).
Visibility of Internal & Surface Graining:
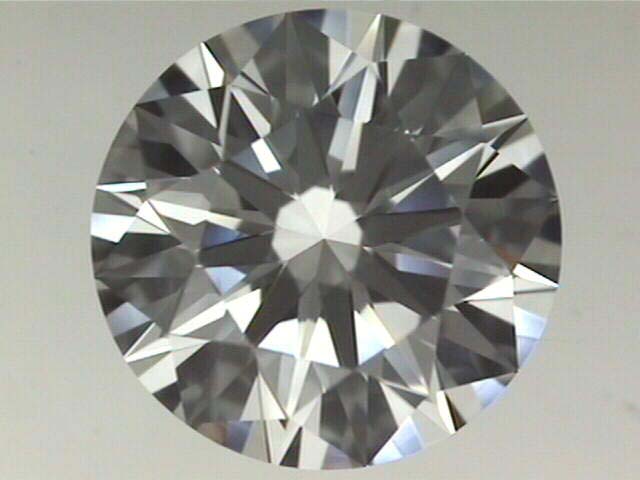
Internal and Surface grain lines.
Obviously, the presence of visible grain lines can affect the clarity grade of a diamond. Especially if no other clarity characteristics are present. In that case, the grain lines might serve as the basis for the clarity grade.
In other words, a diamond that contains small diamond crystals might warrant a VS-1 clarity grade. However, the diamond might receive a grade of VS-2 if internal graining is present.
On the other hand, a diamond that might appear to be Internally Flawless, might be downgraded to VVS-1 if grain lines are present. Under those circumstances, the comment (the) "clarity grade (is) based on internal graining" is applicable.
Whereas no other indications of clarity characteristics may appear within the key to symbols. The round brilliant cut diamond on the left contains internal grain lines.
The internal graining is not readily visible here at 10x magnification. Consequently, 10x magnification is the industry standard for diamond clarity grading.
As a matter of fact, internal grain lines are very difficult to locate even with higher degrees of magnification. One of the reasons that internal grain lines are hard to locate is because they are translucent.
In addition, internal grain lines look similar to the edge of the facets on a diamond. Although that may be true, they do tend to be easier to find if they appear under the table facet.
Is Internal Graining and Surface Graining Bad?
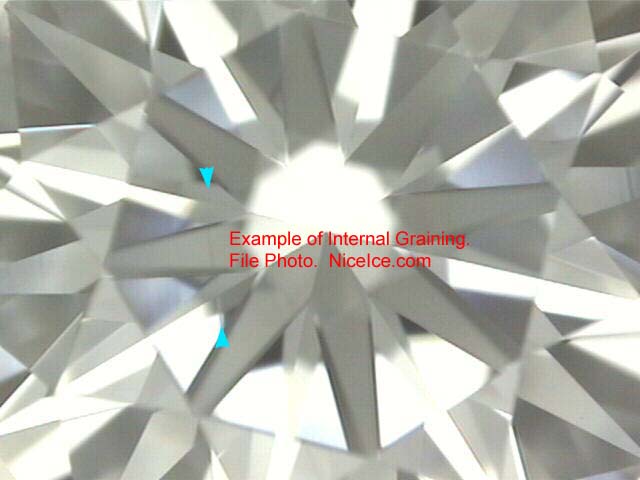
Internal grain lines under normal lighting.
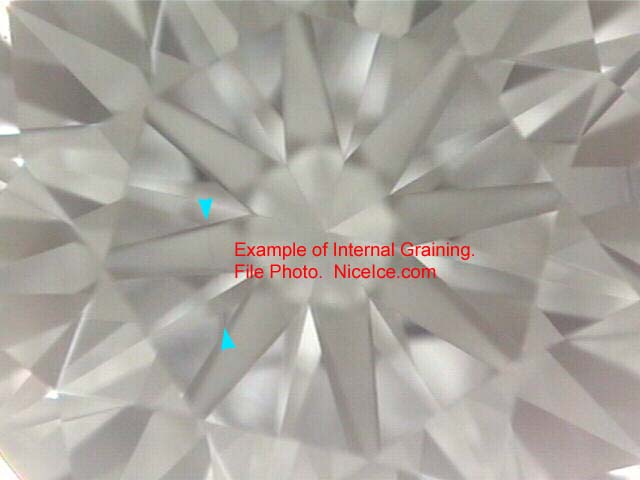
Internal grain lines under diffused lighting.

Internal grain lines under normal lighting.
As a matter of fact, we consider Internal Graining not to be an absolute characteristic. That's because the visibility depends on the lighting conditions. In addition, the angle from which you observe the diamond will also play a factor.
Under those circumstances, the grain lines might be visible to a trained grader under laboratory conditions. However, you might not be able to find the grain lines using magnification under a different light source.
Although this may be true, the grain structure of the diamond may only be visible under certain conditions. In that case, I don't think that grain lines are anything to worry about. After all, it's not like you're likely to see them with any degree of clarity.

Extreme close-up of internal grain lines under normal lighting.
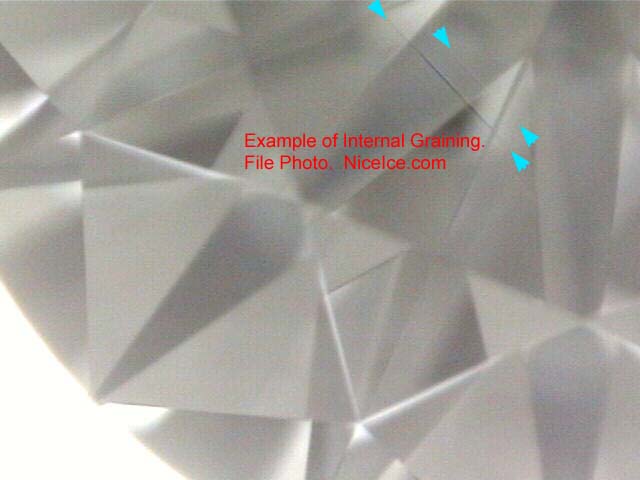
Extreme close-up of internal grain lines under diffused lighting.
These photographs show internal graining under the table facet at various degrees of magnification. In this case, the grain lines appear between the blue arrows. As a matter of fact, you can see how the appearance of the grain lines changes with different light sources.
Surface Grain Lines (Graining):
In the first place, I admit that the comment "Surface Graining Not Shown” might seem ominous. However, it is not something that you are likely to see with just your eyes. Once again, this means that the grader could see the grain lines of the diamond.
However, they were only able to do so using higher degrees of magnification. So, this is not something that you are going to be able to see without magnification. By the way, are you beginning to see the correlation between the names of inclusions and how they look?
For example, surface graining is a transparent line on the surface of a diamond. That's pretty simple, isn't it?
With that in mind, surface grain lines are basically the same as internal grain lines. However, surface grain lines appear on the surface of the diamond.
Whereas internal grain lines appear within the crystal structure. That makes sense, doesn't it? Although that may be true, surface graining may appear across the facet junction points.
As a matter of fact, the labs will not indicate surface graining unless it crosses over the facet line. If the grain line does not cross the facet line, then it is a characteristic of polish.
In that case, most instances of surface graining are insignificant and very difficult to find. In fact, we're only able to find it because we're using higher degrees of magnification.
Specifically, we're probably going to use 50 - 70x magnification to find this type of inclusion. Whereas the industry standard for diamond clarity grading is only 10x.
Inclusions Reflecting or Mirroring:
Obviously, the facets of a diamond act like tiny mirrors that reflect light in all directions. Under those circumstances, it's common for inclusions to reflect within the diamond. As a matter of fact, it's not uncommon for inclusions to reflect multiple times.
In that event, it's possible for a single inclusion to make a diamond look rather busy. However, there might really be only one or two physical inclusions within the diamond.
As a matter of fact, it can be very confusing to people when they see this type of effect. After all, they look at the diamond and see a bunch of inclusions that don't appear on the plotting diagram.
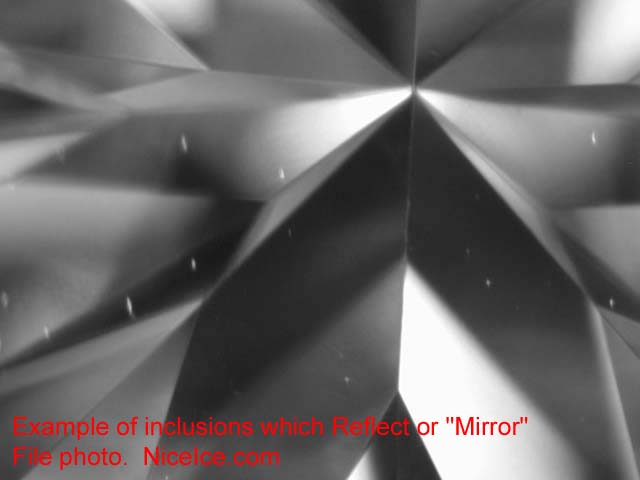
Inclusions mirroring or reflecting.
The photograph on the left is a perfect example of how inclusions can mirror within a diamond. As you can see, the same inclusion is reflecting into several different positions.
In that case, it makes the diamond seem busier and more included than it really is. Can you determine which of the white spots in this clarity photograph are the actual diamond crystals?
As a matter of fact, the phenomena of inclusions mirroring inside diamonds is prominent in photographs. In other words, it seems more apparent in photographs and occurs less often under normal circumstances.
That means that we don't always see the same degree of mirroring through a loupe. Obviously the phenomena of inclusions mirroring and reflecting often presents a point of confusion for people.
Is It Bad for Inclusions to Mirror or Reflect?
As you might imagine, this kind of mirroring effect can make it challenging to correctly identify the primary inclusions. At the same time, it can make it hard to match up the inclusions with the plotting diagram.
That means that you might have trouble verifying that the diamond matches the lab report. However, an independent gemologist should be able to verify the diamond easily enough. After all, they'll have the experience and the gemological tools to evaluate the diamond properly.
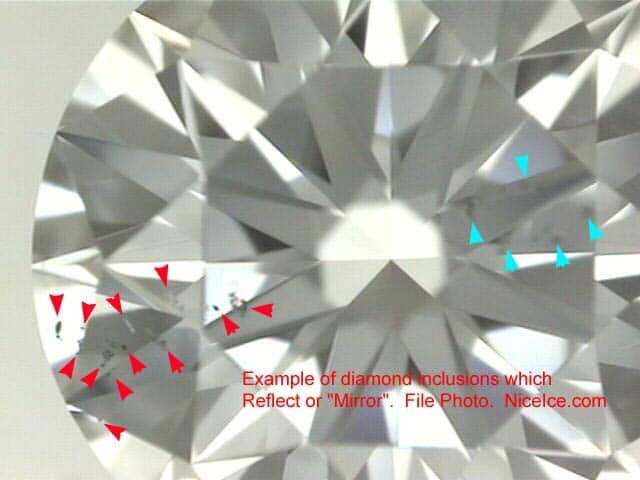
Inclusions reflecting under magnification.
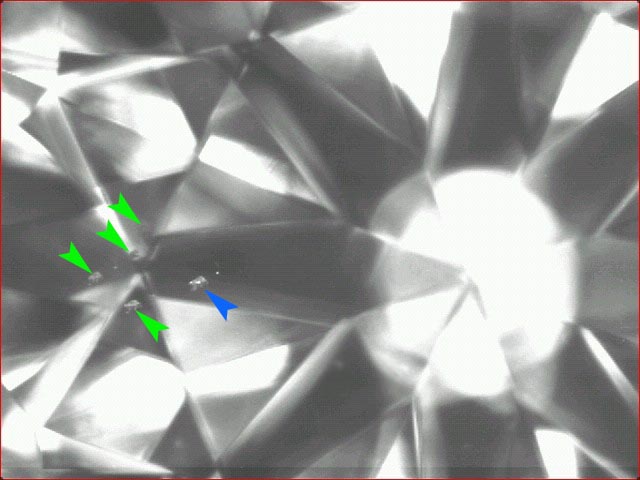
Close-up of inclusions mirroring.
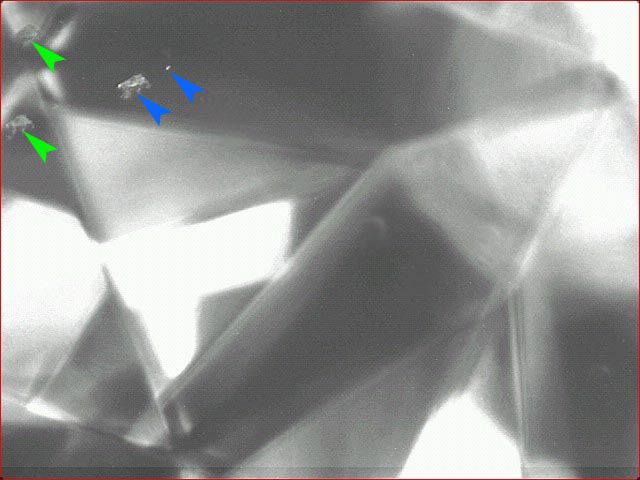
Extreme close-up of inclusions reflecting.
The photograph above on the left is a great example of the mirroring effect within diamonds. While the actual inclusions on the left are highlighted by the red arrows. And the reflections of the inclusions are marked with the light blue arrows on the right.
In the second photograph (middle) the table facet appears at 40x magnification. Whereas the blue arrows indicate the actual inclusions. And the green arrows point to the reflections of the actual inclusions.
The third photograph shows the inclusions as they appear through 70x magnification. As you can see, the higher degree of magnification makes it rather easy to see the inclusions. The thing to remember is that the structure of a diamond is a lot like a fun house of mirrors. As such, it can be challenging to separate the real inclusions from the reflections.
Twinning Wisps Inclusions:
A twinning wisp is inter-growth in the form of an included twisted crystal plane. As such, twinning wisps are one of the more difficult types of diamond inclusions to evaluate. That's because extensive twinning wisps have the potential to make a diamond look cloudy.
Especially if the twinnings wisps contain dark crystal inclusions which happen to be pretty common. However, a slight twinning wisp that contains crystals that are lighter in color is likely to be of no consequence.
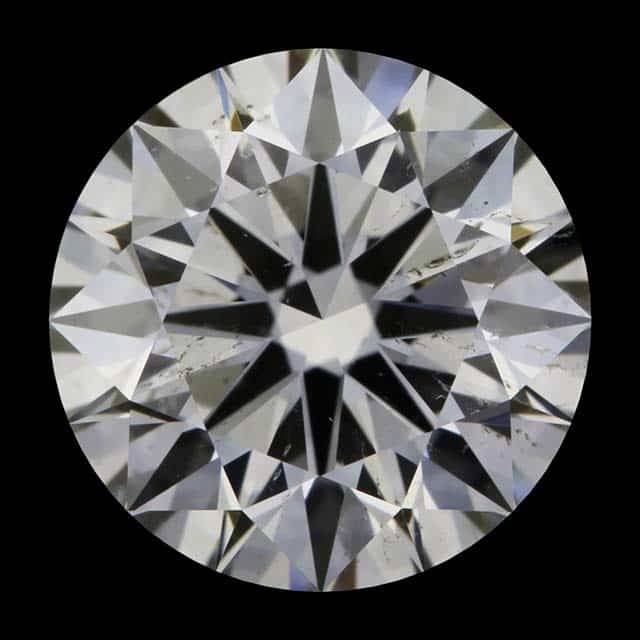
Twinning Wisp Inclusions SI2 Clarity Diamond.
The photograph on the left shows a twinning wisp inside an SI-2 clarity diamond. If you look closely, then you should be able to see the spattering effect throughout the stone.
As a matter of fact, the twinning wisps are most visible in the relative 2:30 and eight o'clock regions. Obviously, the spattering of little black crystals is creating some cloudiness in those areas.
Although this may be true, it's important to note that not all twinning wisps have this effect. As a matter of fact, if these inclusions were lighter in color, then this might be an eye-clean SI-2.
Under those circumstances, it is likely that you would have difficulty seeing the inclusions without magnification.
ASET Scope Shows Twinning Wisps:
Enter your text here...
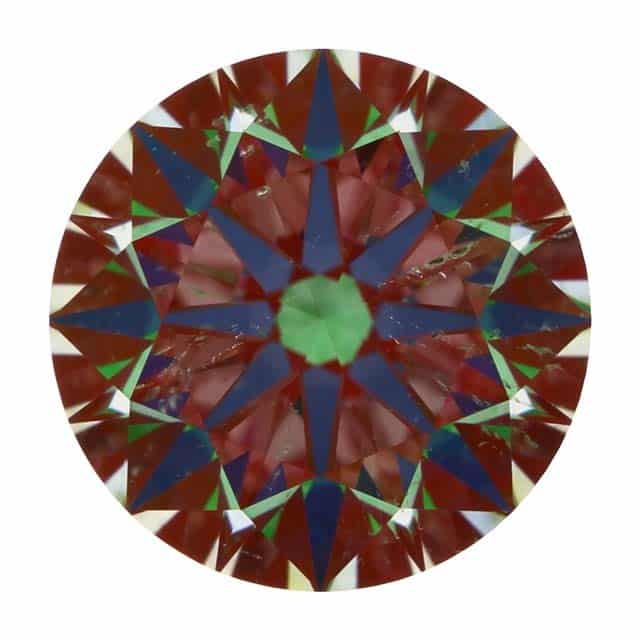
Twinning Wisps As Seen Through ASET Scope.
The photograph to the left provides us an interesting perspective of twinning wisps through an ASET Scope. Although an ASET Scope is not intended for clarity grading, the different colors provide contrast.
Under those circumstances, it enables us to see the twinning wisps in a different light. From this perspective it should be easier for you to see the twinning wisp inclusions under the table facet. Once again, the twinning wisps are more apparent in the 2:30 and eight o'clock regions.
As a matter of fact, the purpose of an ASET Scope is to help us judge diamond light performance. The different colors represent regions of the hemisphere where the diamond is gathering light from.
In addition, it can help us identify light leakage and see how evenly a diamond is reflecting light. As a matter of fact, the light pink sections under the table facet indicate a moderate amount of light leakage. Refer to this article for more information on what the different colors of ASET mean.
Pear-shaped Diamond with Twinning Wisps:
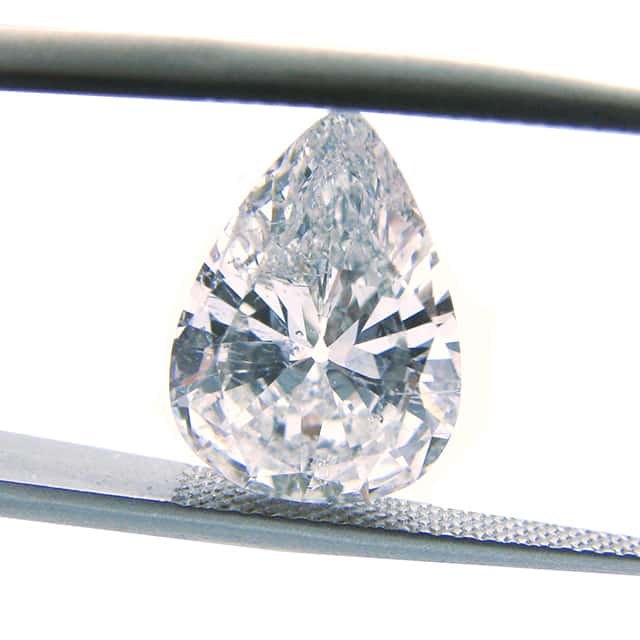
Twinning wisps in pear-shape diamond.
This I-1 clarity pear-shape diamond contains heavy concentrations of twinning wisp inclusions and laser drill holes. In this case, the twinning wisps appear to be whiter because the crystals are mostly transparent.
However, the heavy concentration of twinning wisps within this diamond are making it look cloudy. As a matter of fact, twinning wisps are frequently found in fancy shape diamonds. Especially fancy shape diamonds, such as pear-shapes, heart shapes, and triangles. That's because they are often fashioned from twinned diamond crystals.
However, twinning wisps can appear within other diamond shapes as well. Needless to say, it just depends on the quality of the diamond rough in each instance.
Laser Drill Holes:
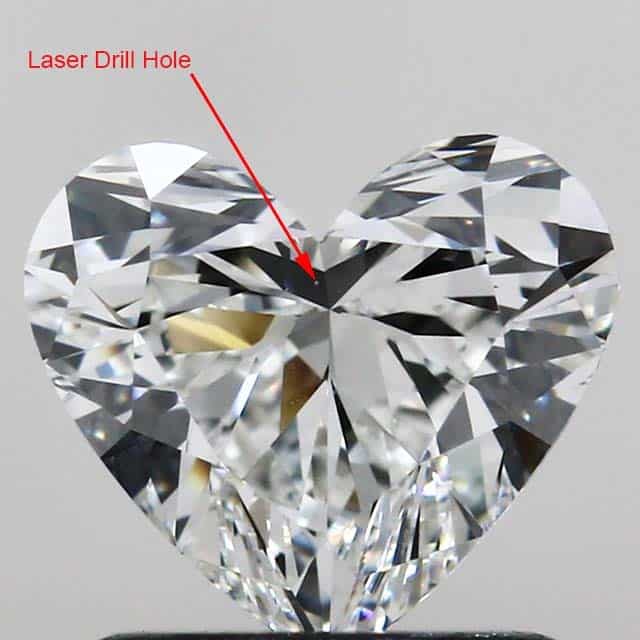
Laser drill hole in heart-shape diamond.
The heart shape diamond on the right contains a laser drill hole as indicted by the red arrow. In this case, the laser drill hole looks like a small white dot in the face-up position.
As a matter of fact, diamond manufacturers sometimes laser drill diamonds to make inclusions less noticeable. The key to symbols on the lab report will indicate the inclusion as a laser drill hole.
In some cases, the manufacturer might also fill the laser drill hole with a clear substance. Under those circumstances, the seller should disclose the diamond as being laser drilled and fracture filled. Although that may be true, they are most likely to say that the diamond is clarity enhanced.
Identifying Laser Drill:
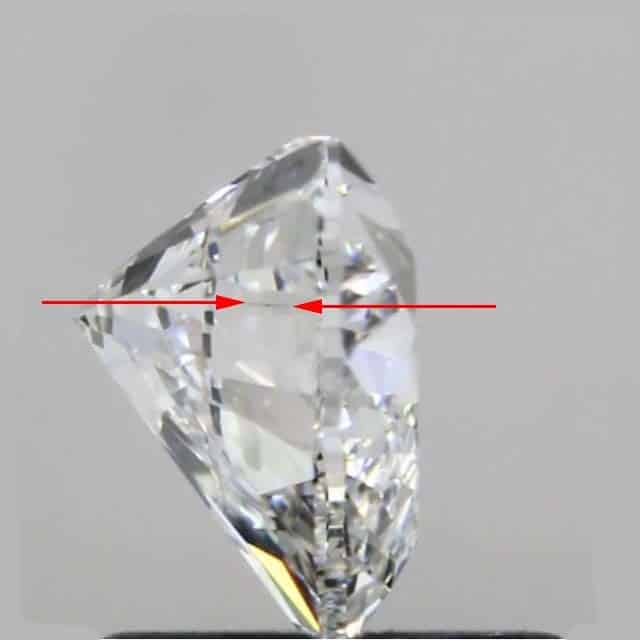
Laser drill hole in diamond from side profile.
In this case, the laser drill hole in this heart shape diamond is more easily seen from the side profile. The most visible section of the laser drill hole appears between the red arrows in the photograph to the left.
If you look closely you will see that a reflection of the laser drill hole is mirroring into multiple locations. As a matter of fact, this diamond is laser drilled. However, it is not fracture filled. In other words, it has not been clarity enhanced. That is why we can see the laser drill hole.
If this diamond was clarity enhanced, then you might see a flash of blue or some other color in that region. That's because FTC guidelines require disclosure of clarity enhancement or treatment.
Consequently, we automatically reject any diamond that has been laser drilled or fractured filled.
Etch Channel Inclusions:
In the first place, there are two types of etch channel inclusions that can occur within diamonds. On the one hand, an etch channel can be natural. In that case, the etch channel is the result of gas bubbles escaping the diamond under extreme pressure.
On the other hand, an etch channel can be a remnant of the laser drilling process. In either case, we routinely reject diamonds that contain etch channel inclusions.
Lake Waimangu Thermal Park.
This photograph of a steaming geothermal crater in Lake Waimangu Thermal Park seems aptly appropriate. After all, it might be this type of steam under pressure that creates etch channels in diamonds.
Although this might be true, the high pressure steam that is necessary to create etch channels might be more intense. Under those circumstances, the gas bubbles are having to push their way through diamond. As a matter of fact, diamond is the hardest mineral substance on earth, so it's less porous than rock.
Enhancing Diamond Clarity by Laser Drilling
Suffice to say that it's an interesting concept, so just work with me here. Consequently, laser drilling diamonds to reduce the visibility of inclusions is nothing new. As a matter of fact, it is a technique that has been around for years. Be that as it may, I'm obviously not fond of the idea and reject diamonds with laser drill holes.
Generally speaking, we reject diamonds that have been laser drilled, fracture filled, and/or clarity enhanced. We also reject natural diamonds that have been high-pressure heat-treated (HPHT). That's because I prefer diamonds to be the way nature intended. Although that may be true, the popularity of lab-grown diamonds seems to be growing.
Natural vs Man-made Etch Channel:
As a matter of fact, there is only one way for us to know whether an etch channel is natural or man-made. That is to look for the phrase "internal laser drilling is present" in the comments section of the lab report.
In either case, etch channel inclusions are shown on the plotting diagram as green squares inside a red border. The red arrows on the left point to the etch channels within this diamond.
The etch channels within this 1.51 carat, D-color, SI-1 clarity, GIA Excellent cut diamond from Blue Nile are natural. That's because the phrase "internal laser drilling is present" is not present on the lab report.
Identifying Etch Channels:
Take a look at the details for this 1.51 carat, D-color, SI-1 clarity, GIA Excellent cut diamond from Blue Nile. Once the page loads, click on the photograph of the diamond to the left of the video frame. That will enable you to view the diamond in the static face-up position.
From that vantage point, you will be able to see the larger etch channel inclusion. In this case, it is under the table facet. There are also a couple of etch channels out along the edge of the crown facets.
The location of the etch channels is shown here using red arrows. However, the location to the plotting diagram is relative to the position of the diamond.
What Do Etch Channels Look Like?
This 1.51 carat, D-color, SI-1 clarity, GIA Excellent cut diamond from Blue Nile contains etch channel inclusions. The red arrows indicate the relative location of the etch channels in this diamond. From the face-up vantage point, these etch channels look similar to diamond crystals.
However, the etch channel inclusions look more like laser drill holes from the side profile. Of course, etch channels within diamonds are neither crystals nor laser drill holes.
As a matter of fact, natural etch channels are the result of gas bubbles escaping the diamond under high pressure. However, an etch channel can also be a remnant of laser drilling the diamond to reduce the appearance of inclusions.
We can use the ASET Scope image on the right to get a different perspective of the inclusions. However, the actual purpose of the ASET Scope image is to help us judge the light performance. In this case, the light pink and semi-transparent sections indicate a moderately high degree of light leakage.
Consequently, we automatically reject any diamond that contains etch channels.
Wrapping Up Diamond Clarity
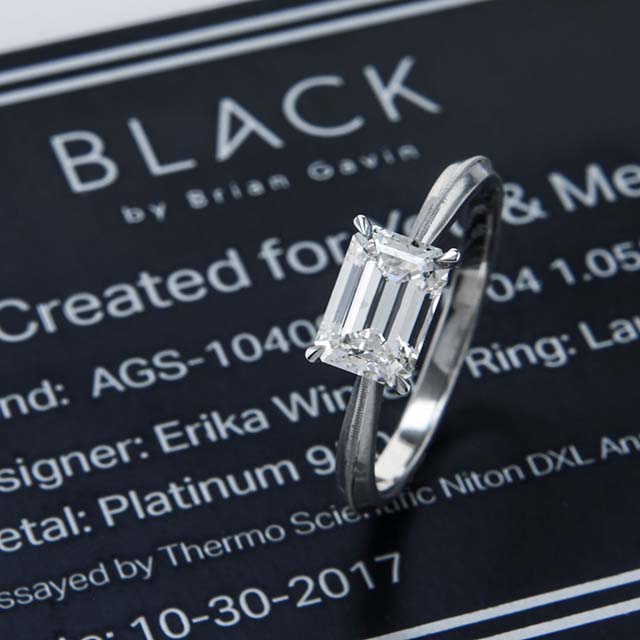
Black by Brian Gavin Emerald Cut Diamond Solitaire.
As can be seen, there is a lot more to diamond clarity grading than meets the unaided eye. With that in mind, this tutorial on diamond clarity and inclusions is quite extensive.
Be that as it may, the reality is that there is a lot more to know about diamond clarity grading. As a matter of fact, we could probably write an entire book on the subject of diamond clarity characteristics.
Although that may be true, it still wouldn't be possible to account each individual detail. With that in mind, I invite you to take advantage of our Free Diamond Concierge Service.
Let us know the price range you are working with and the characteristics you are willing to consider. We'll run the search and provide you with the best options currently available.
Or, if you already have a diamond in mind, just provide us with a link and we'll check it out. Either way, you'll be able to buy a diamond with the confidence of better understanding of the details.

